100+ React Interview Questions Straight from Ex-interviewers (2026)
100+ React and React Native interview questions and answers from ex-FAANG interviewers. Updated for 2026 with React 19: Actions, Server Components, the use hook and the React Compiler.
Preparing for a React interview can be daunting, but having access to the right questions can make all the difference. We've created a prioritized list of 150 questions and solutions, covering essential topics like React fundamentals, React Hooks, React Router, internationalization in React, testing of React apps, and the latest React 19 features.
The questions are grouped into Freshers, Experienced, and Senior sections. This comprehensive guide is designed to help you prepare effectively, boost your confidence, and ensure you make a strong impression during your interview.
If you're looking for more in-depth React interview preparation materials, also check out these resources:
- React Interview Playbook
- Practice React coding interview questions
- Practice React quiz interview questions
Freshers
Freshers with 0–2 years of experience: practice explaining component behavior, writing simple interactions, and testing the visible result.
Components and JSX
1. What is React, and what are its main features?
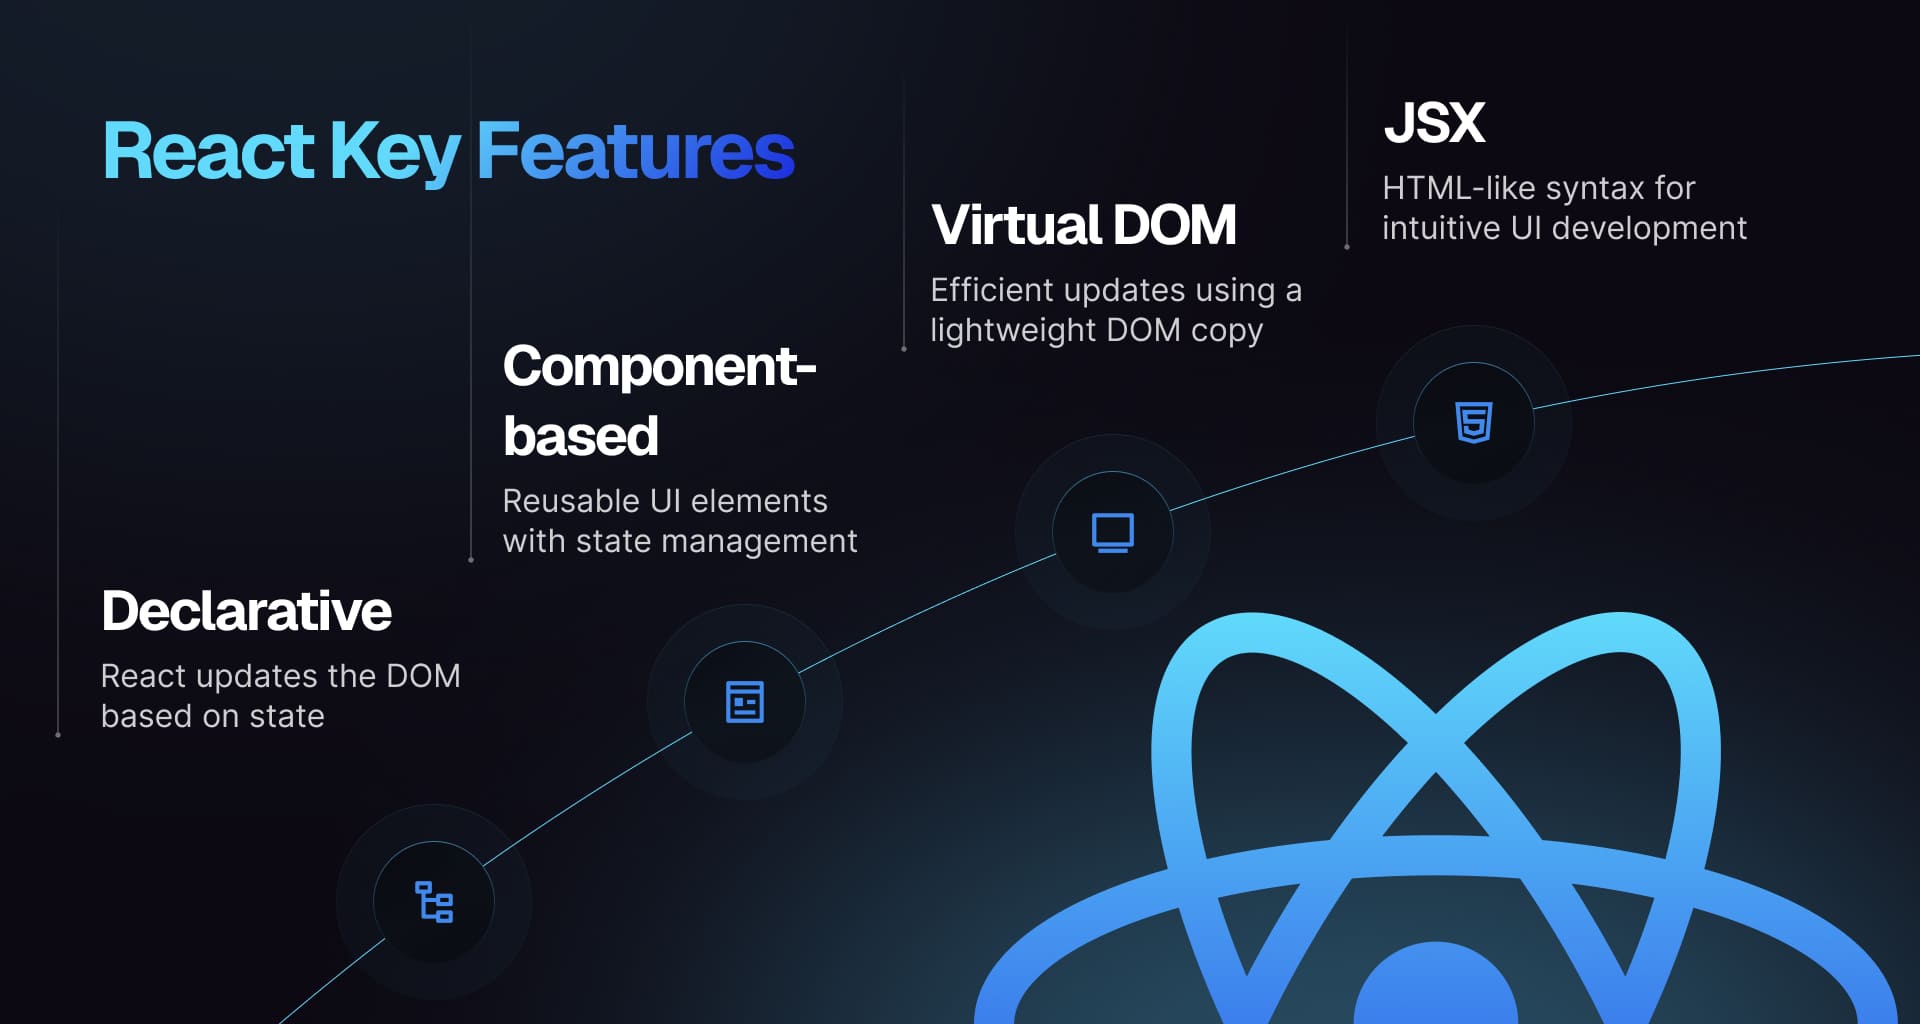
React is a JavaScript library developed by Facebook for creating user interfaces, particularly in single-page applications. It enables the use of reusable components that manage their own state. Key advantages include a component-driven architecture, optimized updates through the virtual DOM, a declarative approach for better readability, and robust community backing.
Find in-depth explanations and track study progress here ->
2. What is JSX and how does it work?
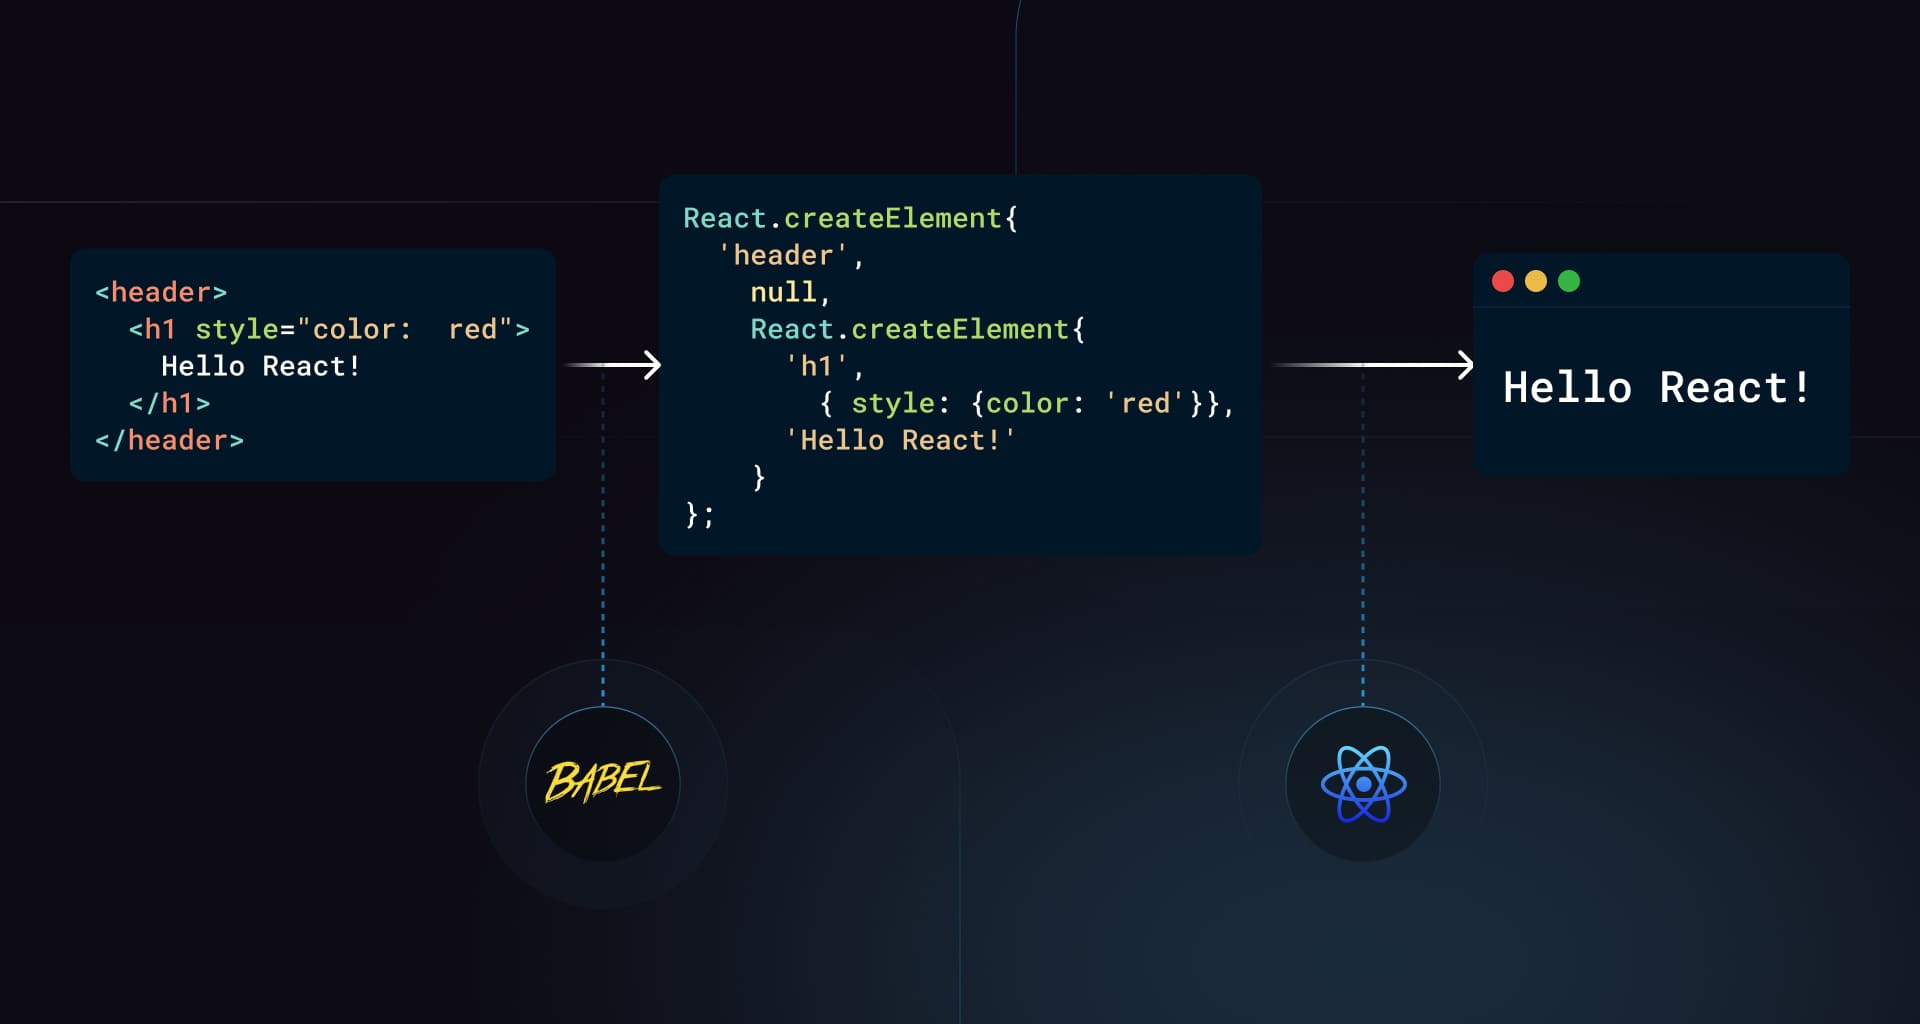
JSX, short for JavaScript XML, is a syntax extension for JavaScript that allows you to write HTML-like code within JavaScript. It makes building React components easier. JSX gets converted into JavaScript function calls, often by Babel. For instance, <div>Hello, world!</div> is transformed into React.createElement('div', null, 'Hello, world!').
Find in-depth explanations and track study progress here ->
3. Explain the concept of the Virtual DOM in React.
The virtual DOM is a simplified version of the actual DOM used by React. It allows for efficient UI updates by comparing the virtual DOM to the real DOM and making only the necessary changes through a process known as reconciliation.
Find in-depth explanations and track study progress here ->
4. What is the difference between Shadow DOM and Virtual DOM?
The Shadow DOM is a web standard that encapsulates a part of the DOM, isolating it from the rest of the document. It's used for creating reusable, self-contained components without affecting the global styles or scripts.
The Virtual DOM is an in-memory representation of the actual DOM used to optimize rendering. It compares the current and previous states of the UI, updating only the necessary parts of the DOM, which improves performance.
5. What is the difference Between React Node, React Element, and React Component?
A React Node refers to any unit that can be rendered in React, such as an element, string, number, or null. A React Element is an immutable object that defines what should be rendered, typically created using JSX or React.createElement. A React Component is either a function or class that returns React Elements, enabling the creation of reusable UI components.
Find in-depth explanations and track study progress here ->
6. What are React Fragments used for?
React Fragments allow you to group multiple elements without adding extra nodes to the DOM. They are particularly useful when you need to return multiple elements from a component but don't want to wrap them in a container element. You can utilize shorthand syntax <>...</> or React.Fragment.
return (<><ChildComponent1 /><ChildComponent2 /></>);
Find in-depth explanations and track study progress here ->
7. What are props in React? How are they different from state?
Props (short for properties) are inputs to React components that allow you to pass data from a parent component to a child component. They are immutable and are used to configure a component. In contrast, state is internal to a component and can change over time, typically due to user interactions or other events.
Find in-depth explanations and track study progress here ->
8. What is the difference between React's class components and functional components?
Class components are ES6 classes that extend React.Component and rely on lifecycle methods componentDidMount, componentDidUpdate, etc.) and this.state. Function components are plain functions that take props as input and return JSX, and use hooks (useState, useEffect, useRef, etc.) for state and side effects. Since hooks landed in React 16.8, function components are the default for new code; class components are kept for backward compatibility and are no longer the recommended pattern.
9. What are stateless components?
Stateless components in React are components that do not manage or hold any internal state. They simply receive data via props and render UI based on that data. These components are often functional components and are used for presentational purposes.
Key points:
- Do not use
this.state - Render UI based on
props - Focused on displaying information, not managing behavior
function StatelessComponent({ message }) {return <div>{message}</div>;}
useState hook.10. What are stateful components?
Stateful components in React are components that manage and hold their own internal state. They can modify their state in response to user interactions or other events and re-render themselves when the state changes.
Key points:
- Use
this.state(in class components) oruseState(in functional components) - Can update state using event handlers or lifecycle methods
- Handle logic and data management
function StatefulComponent() {const [count, setCount] = React.useState(0);return (<div><p>{count}</p><button onClick={() => setCount(count + 1)}>Increment</button></div>);}
Stateful components are essential for handling dynamic and interactive UIs.
11. What is the role of PropTypes in React?
PropTypes was React's runtime prop type-checker. You declared expected types, and React would warn in the console when a mismatch occurred in development.
import PropTypes from 'prop-types';function MyComponent({ name, age }) {return (<div>{name} is {age} years old</div>);}MyComponent.propTypes = {name: PropTypes.string.isRequired,age: PropTypes.number.isRequired,};
PropTypes is deprecated as of React 19 and no longer ships from the react package. Use TypeScript instead; it catches the same mismatches at compile time and integrates with editor tooling.
12. What are the recommended ways for type checking of React component props?
Use TypeScript. It catches prop mismatches at compile time, integrates with editor tooling (autocomplete, refactors, jump-to-definition), and is the default in most React project templates.
type MyComponentProps = {name: string;age: number;};function MyComponent({ name, age }: MyComponentProps) {return (<div>{name} is {age} years old</div>);}
The older alternative was PropTypes, a runtime checker that warned in dev mode when prop types didn't match. It is deprecated as of React 19 and no longer ships from the react package. If you're maintaining a codebase that still uses prop-types, migrate to TypeScript.
13. Why can count && <Badge /> unexpectedly render a zero?
The && expression returns its left operand when that operand is falsy. With count equal to 0, the expression returns 0, and React renders that number.
Use a boolean condition, such as count > 0 && <Badge />, or an explicit ternary that returns null. This matters when a badge disappears but an unexplained zero remains in the UI. See conditional rendering.
14. What is the difference between onClick={save} and onClick={save()}?
onClick={save} passes a function for React to call when the event happens. onClick={save()} calls it during render and passes its return value as the handler, which is usually a bug and can cause repeated updates.
To pass an argument, use onClick={() => save(record.id)}. Rendering should calculate UI, while event handlers perform work caused by that interaction. See responding to events.
State, lists, and events
15. What is the purpose of the key prop in React?
In React, the key prop is used to uniquely identify elements in a list, allowing React to optimize rendering by updating and reordering items more efficiently. Without unique keys, React might re-render elements unnecessarily, causing performance problems and potential bugs.
{items.map((item) => <ListItem key={item.id} value={item.value} />);}
Find in-depth explanations and track study progress here ->
16. What is the consequence of using array indices as keys in React?
Using array indices as keys can lead to performance issues and unexpected behavior, especially when reordering or deleting items. React relies on keys to identify elements uniquely, and using indices can cause components to be re-rendered unnecessarily or display incorrect data.
Find in-depth explanations and track study progress here ->
17. What is the difference between Controlled and Uncontrolled React components?
In controlled components, form data is managed through the component's state, making it the definitive source of truth. Input value changes are handled by event handlers. In uncontrolled components, the form state is managed internally and accessed via refs. Controlled components provide more control and are easier to test, while uncontrolled components are simpler for basic use cases.
Example of a controlled component:
function ControlledInput() {const [value, setValue] = React.useState('');return (<inputtype="text"value={value}onChange={(e) => setValue(e.target.value)}/>);}
Example of an uncontrolled component:
function UncontrolledInput() {const inputRef = React.useRef();return <input type="text" ref={inputRef} />;}
Find in-depth explanations and track study progress here ->
18. How would you lift the state up in a React application, and why is it necessary?
Lifting state up in React involves moving the state from child components to their nearest common ancestor. This pattern is used to share state between components that don't have a direct parent-child relationship. By lifting state up, you can avoid prop drilling and simplify the management of shared data.
// Lifting state upconst Parent = () => {const [counter, setCounter] = useState(0);return (<div><Child1 counter={counter} /><Child2 setCounter={setCounter} /></div>);};const Child1 = ({ counter }) => <h1>{counter}</h1>;const Child2 = ({ setCounter }) => (<button onClick={() => setCounter((prev) => prev + 1)}>Increment</button>);
In this example, the state is managed in the Parent component, and both child components access it via props.
19. Why does React recommend against mutating state?
React advises against mutating state as it can lead to unexpected behaviors and bugs. State immutability helps efficiently determine when components need re-rendering; direct mutations may prevent React from detecting changes.
Find in-depth explanations and track study progress here ->
20. What does re-rendering mean in React?
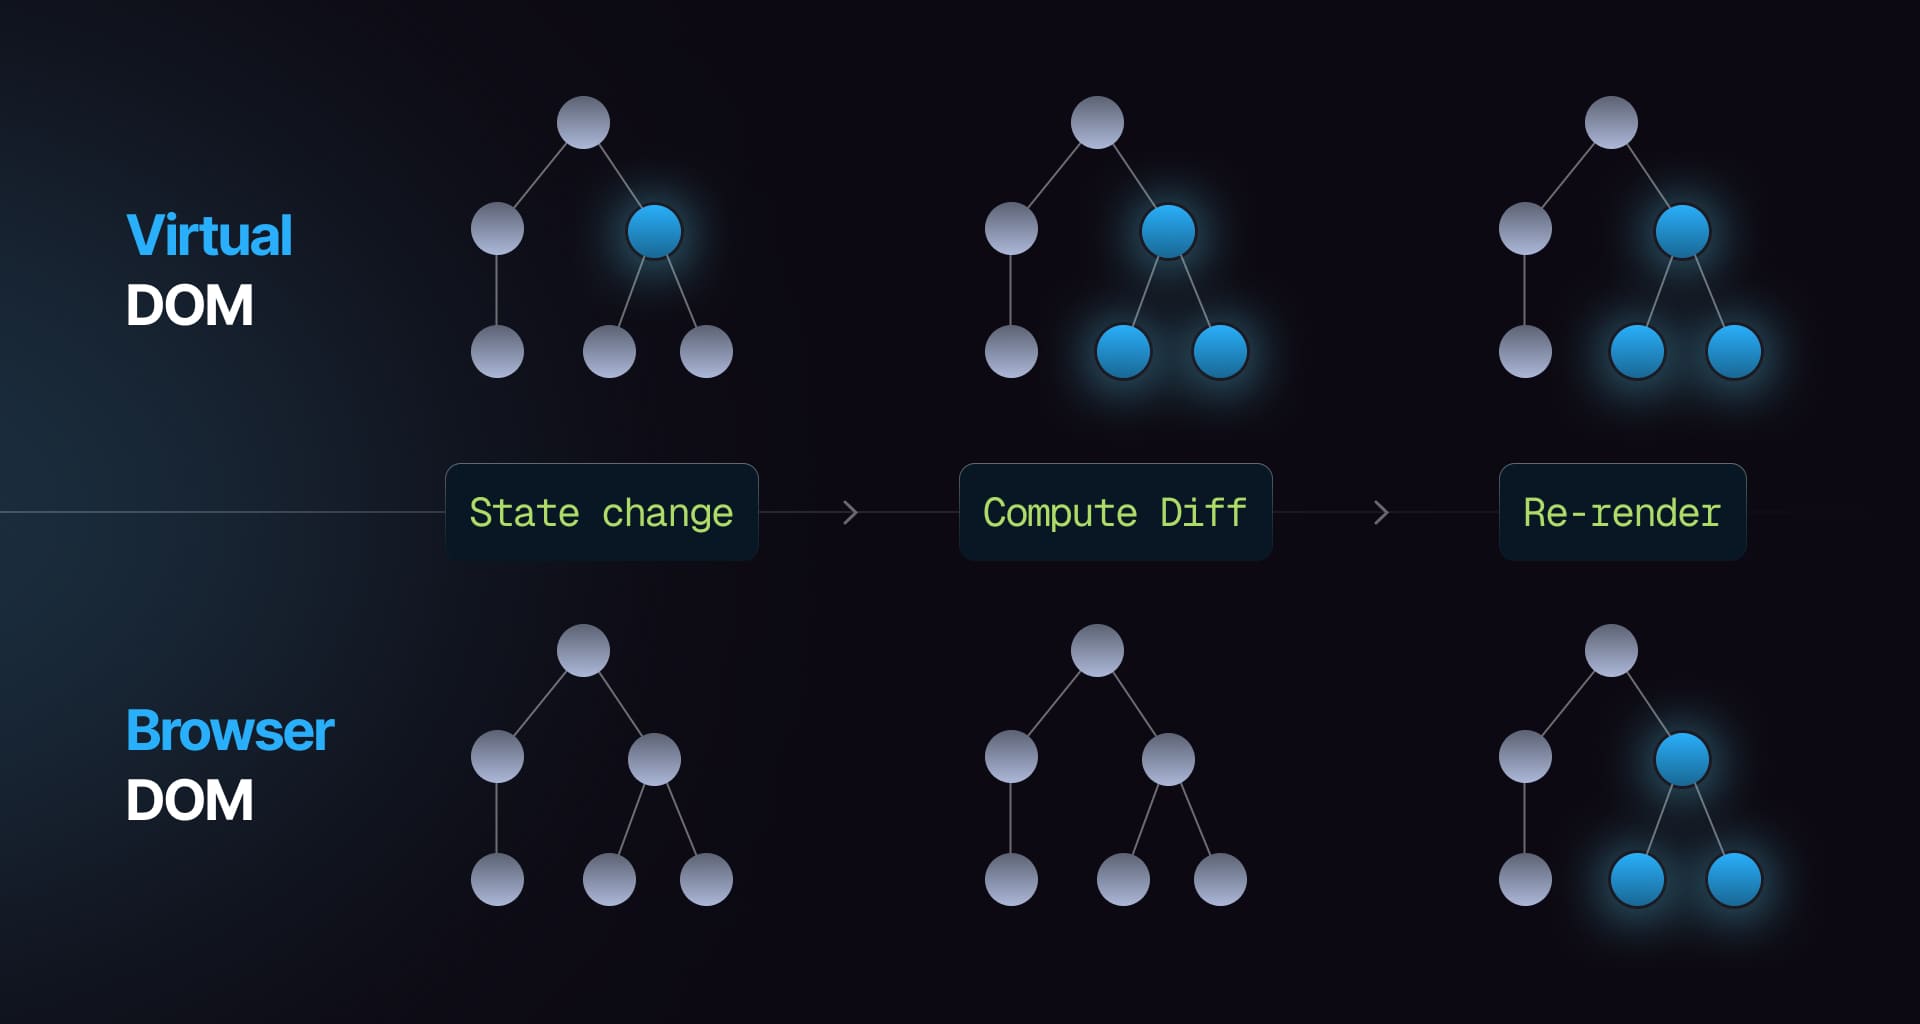
In React, re-rendering refers to the process of updating the user interface (UI) in response to changes in the component's state or props. When the state or props of a component change, React re-renders the component to reflect the updated data in the UI.
This involves:
- Recalculating the JSX returned by the component
- Comparing the new JSX with the previous one (using the Virtual DOM)
- Updating the real DOM with only the differences (efficient rendering)
- Re-rendering ensures that the UI stays in sync with the component's state and props
Find in-depth explanations and track study progress here ->
21. Explain one-way data flow of React
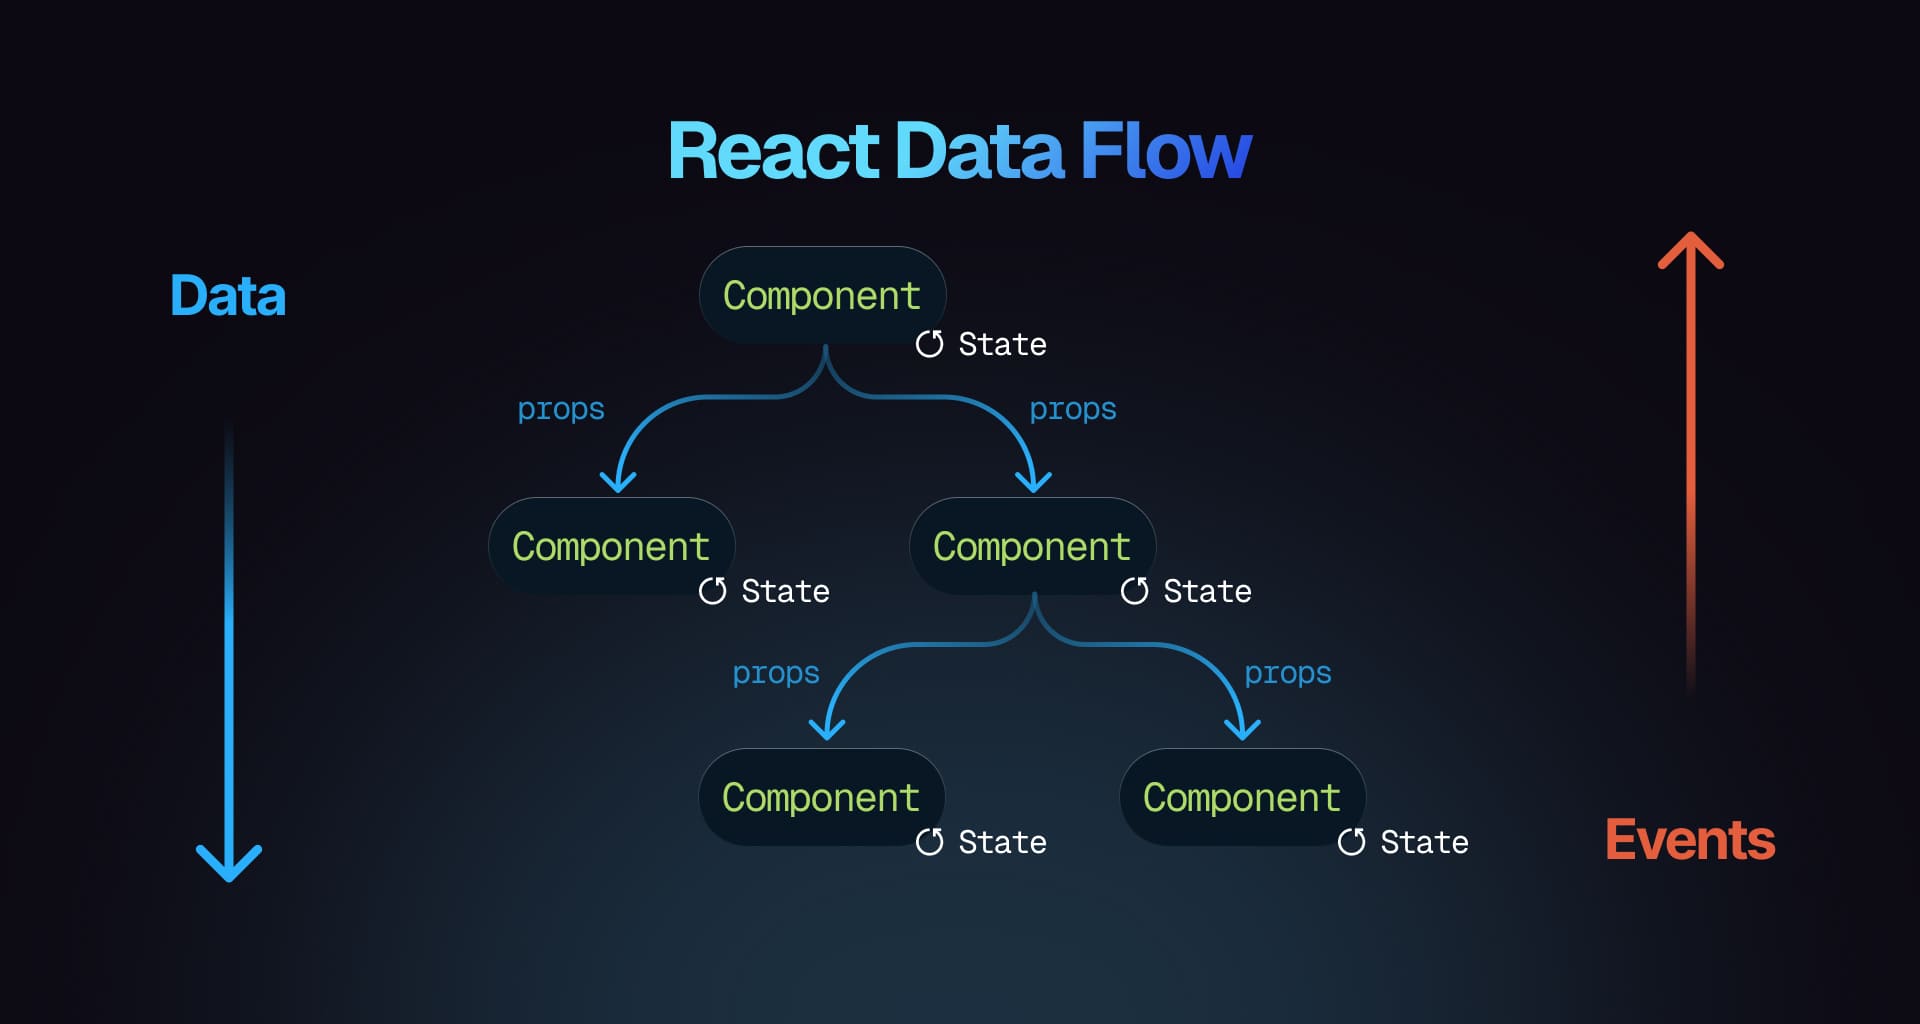
In React, one-way data flow means data moves from parent to child components through props.
- Parent to child: The parent passes data to the child
- State updates: To change data, the child calls a function passed down by the parent
Example:
function Parent() {const [count, setCount] = React.useState(0);return <Child count={count} increment={() => setCount(count + 1)} />;}function Child({ count, increment }) {return <button onClick={increment}>Count: {count}</button>;}
This ensures data flows in one direction, making the app more predictable.
Find in-depth explanations and track study progress here ->
22. Explain what happens when setState is called in React?
When setState is called in React:
- State update: It updates the component's state, triggering a re-render of the component
- Batching: React may batch multiple setState calls into a single update for performance optimization
- Re-render: React re-renders the component (and its child components if needed) with the new state
- Asynchronous: State updates may be asynchronous, meaning React doesn't immediately apply the state change; it schedules it for later to optimize performance
Example:
function Counter() {const [count, setCount] = React.useState(0);const increment = () => {setCount(count + 1); // Calls setState to update state};return <button onClick={increment}>Count: {count}</button>;}
In this example, calling setState (via setCount) triggers a re-render with the updated count.
23. Explain prop drilling
Prop drilling is when you pass data from a parent component to a deeply nested child component through props, even if intermediate components don't use it.
Example:
function Grandparent() {const data = 'Hello from Grandparent';return <Parent data={data} />;}function Parent({ data }) {return <Child data={data} />;}function Child({ data }) {return <p>{data}</p>;}
In this example, data is passed through multiple components, even though only the Child component uses it. Prop drilling is acceptable for small applications where the component hierarchy is shallow. When global state is needed to be accessed in deeper levels of the app, using context and/or external state managers might be better.
24. Discuss synthetic events in React
Synthetic events in React are a wrapper around native DOM events that ensure consistent behavior across browsers. They normalize the way events are handled, providing a unified API for React applications.
These events are wrapped in the SyntheticEvent object and expose the usual methods like preventDefault() and stopPropagation(). Since React 17, the root event listener is attached to the React root container (not document), which makes nested React trees work correctly together.
Example:
function MyComponent() {const handleClick = (event) => {event.preventDefault();console.log('Button clicked');};return <button onClick={handleClick}>Click me</button>;}
Older sources mention event pooling, where React reused the event object after the handler ran, which made the event unusable in async code. Event pooling was removed in React 17, so you can read or pass the event object asynchronously without calling event.persist().
25. What happens when you call a state setter three times in one click handler?
Starting at zero, three calls to setCount(count + 1) all request the value 1 because the handler reads one render's snapshot. Three calls to setCount(c => c + 1) queue three updater functions and produce 3.
Do not use await setCount(...) to wait for rendering: the setter does not return a completion Promise. See updater queues.
Practice the related React quiz →
26. How would you update one field in a nested state object?
Copy each object along the changed path while retaining unchanged branches:
setProfile((previous) => ({...previous,address: { ...previous.address, city: nextCity },}));
This assumes profile.address exists. Mutating previous.address.city after only copying previous still mutates existing state. For deeply nested models, flatten the structure or use a library that produces immutable updates. See nested state updates.
Practice the related React quiz →
27. Why does useState(props.name) not follow later prop changes?
The argument initializes state; React does not overwrite that state every time the prop changes. This is useful for an editable draft but surprising if the UI is meant to always reflect the parent.
If no independent draft is needed, read the prop directly. If the parent should own edits, make the value controlled. If a different record starts a new editing session, a record key can reset it. See avoiding mirrored props.
Practice the related React quiz →
28. How do you fix an uncontrolled-to-controlled input warning?
An input that starts with value={undefined} and later receives a string switches from uncontrolled to controlled. Initialize controlled text state to '', or use value={name ?? ''} when the data may be missing.
For checkboxes, use a boolean checked value. Keep an input controlled or uncontrolled for its entire lifetime, and update controlled state synchronously from onChange. See input troubleshooting.
Practice the related React quiz →
Hooks and composition basics
29. What are the benefits of using hooks in React?
Hooks enable the use of state and other React features in functional components, replacing the need for class components. They streamline code by reducing the reliance on lifecycle methods, enhance readability, and facilitate the reuse of stateful logic across components.
Popular hooks like useState and useEffect are used for managing state and side effects.
Find in-depth explanations and track study progress here ->
30. What are the rules of React hooks?
React hooks should be called at the top level of a function, not inside loops, conditions, or nested functions. They must only be used within React function components or custom hooks. These guidelines ensure proper state management and lifecycle behavior.
Find in-depth explanations and track study progress here ->
31. What does the dependency array of useEffect affect?
The dependency array of useEffect controls when the effect re-runs:
- If it's empty, the effect runs only once after the initial render.
- If it contains variables, the effect re-runs whenever any of those variables change.
- If omitted, the effect runs after every render.
Find in-depth explanations and track study progress here ->
32. What is the useRef hook in React and when should it be used?
The useRef hook creates a mutable object that persists through renders, allowing direct access to DOM elements, storing mutable values without causing re-renders, and maintaining references to values.
For instance, useRef can be utilized to focus on an input element:
import React, { useRef, useEffect } from 'react';function TextInputWithFocusButton() {const inputEl = useRef(null);useEffect(() => {inputEl.current.focus();}, []);return <input ref={inputEl} type="text" />;}
Find in-depth explanations and track study progress here ->
33. What is the useId hook in React and when should it be used?
The useId hook generates unique IDs for elements within a component, which is crucial for accessibility by dynamically creating ids that can be used for linking form inputs and labels. It guarantees unique IDs across the application even if the component renders multiple times.
import { useId } from 'react';function MyComponent() {const id = useId();return (<div><label htmlFor={id}>Name:</label><input id={id} type="text" /></div>);}
Find in-depth explanations and track study progress here ->
34. Can you explain how to create and use custom hooks in React?
To create and use custom hooks in React:
- Create a function that starts with use and uses built-in hooks like
useStateoruseEffect - Return the values or functions you want to share.
Example:
function useForm(initialState) {const [formData, setFormData] = useState(initialState);const handleChange = (e) =>setFormData({ ...formData, [e.target.name]: e.target.value });return [formData, handleChange];}
Use the Hook:
function MyForm() {const [formData, handleChange] = useForm({ name: '', email: '' });return <input name="name" value={formData.name} onChange={handleChange} />;}
Custom hooks let you reuse logic across components, keeping your code clean.
35. Explain the composition pattern in React.
The composition pattern in React involves building components by combining smaller, reusable ones instead of using inheritance. This encourages creating complex UIs by passing components as children or props.
function WelcomeDialog() {return (<Dialog><h1>Welcome</h1><p>Thank you for visiting our spacecraft!</p></Dialog>);}function Dialog(props) {return <div className="dialog">{props.children}</div>;}
Find in-depth explanations and track study progress here ->
36. Do two components calling the same custom Hook share state?
If useCounter() owns state through useState, calling it in two components creates independent state for each invocation. Sharing a function shares logic, not the state stored by React for that call.
To share a value, lift its state to a common owner, distribute it through context, or subscribe both components to an external store. A custom Hook can wrap those mechanisms, but the shared ownership must be explicit. See custom Hook state isolation.
Practice the related React quiz →
Routing and testing basics
37. What is a React Router?
React Router is a popular routing library for React applications that enables navigation between different components based on the URL. It provides declarative routing, allowing you to define routes and their corresponding components in a straightforward manner.
38. How does React Router work, and how do you implement dynamic routing?
React Router maps URL paths to components, enabling navigation in single-page apps. Dynamic routing allows you to use URL parameters to render components based on dynamic values.
import { BrowserRouter, Routes, Route, useParams } from 'react-router-dom';function UserPage() {const { id } = useParams(); // Access dynamic parameterreturn <h1>User ID: {id}</h1>;}export default function App() {return (<BrowserRouter><Routes><Route path="/user/:id" element={<UserPage />} /> {/* Dynamic path */}</Routes></BrowserRouter>);}
Key features:
- Dynamic Segments:
:idcaptures dynamic data from the URL. useParamsHook: Accesses these dynamic values for rendering.
39. How do you navigate programmatically in React Router?
In React Router v6, you can navigate programmatically by using the useNavigate hook. First, import useNavigate from react-router-dom and call it to get the navigate function. Then, you can use navigate('/new-page') to navigate to a different route.
For example:
import { useNavigate } from 'react-router-dom';function MyComponent() {const navigate = useNavigate();const goToPage = () => navigate('/new-page');return <button onClick={goToPage}>Go to New Page</button>;}
In React Router v5, the useHistory hook provides access to the history object, which you can use to push a new route. For example, history.push('/new-page') will navigate to the specified route.
For example:
import { useHistory } from 'react-router-dom';function MyComponent() {const history = useHistory();const goToPage = () => history.push('/new-page');return <button onClick={goToPage}>Go to New Page</button>;}
Both methods allow you to navigate programmatically in React Router.
40. How do you manage the active route state in a multi-page React application?
Use the useLocation hook to get the current route, and conditionally apply styles for the active state.
Example:
import { useLocation } from 'react-router-dom';function NavBar() {const location = useLocation();return (<nav><ul><li className={location.pathname === '/home' ? 'active' : ''}>Home</li><li className={location.pathname === '/about' ? 'active' : ''}>About</li></ul></nav>);}
41. How to get query parameters in React Router?
In React Router v6, you can use the useSearchParams hook to access query parameters from the URL.
Example:
import { useSearchParams } from 'react-router-dom';function MyComponent() {const [searchParams] = useSearchParams();const queryParam = searchParams.get('paramName');return <div>Query Param: {queryParam}</div>;}
This hook allows you to retrieve and manipulate query parameters in React Router v6.
42. How do you pass props to a route component in React Router?
In React Router v6, you can pass props to a route component using the element prop in the <Route> component.
Example:
import { Routes, Route } from 'react-router-dom';function MyComponent({ propValue }) {return <div>Prop Value: {propValue}</div>;}function App() {return (<Routes><Route path="/my-route" element={<MyComponent propValue="Hello" />} /></Routes>);}
In this example, the propValue prop is passed to the MyComponent component when rendering the /my-route route.
43. How do you test React applications?
Testing React applications can be done using Jest and React Testing Library. Jest serves as the testing framework while React Testing Library provides utilities for testing components similarly to user interactions.
Find in-depth explanations and track study progress here ->
44. What is Jest and how is it used for testing React applications?
Jest is a JavaScript testing framework that provides a test runner, assertion library, and mocking support. It's commonly used for testing React applications due to its simplicity and integration with tools like React Testing Library.
45. What is React Testing Library and how is it used for testing React components?
React Testing Library is a testing utility for React that helps test components in a way that resembles how users interact with the application. It provides functions to render components, interact with them, and assert on the rendered output.
46. How do you test React components using React Testing Library?
To test React components using React Testing Library, you can:
- Render the component using
render. - Interact with the component (e.g., clicking buttons, entering text).
- Assert on the rendered output using queries like
getByText,queryByRole, etc.
Example:
import { render, screen, fireEvent } from '@testing-library/react';import MyComponent from './MyComponent';test('renders component', () => {render(<MyComponent />);const button = screen.getByRole('button');fireEvent.click(button);expect(screen.getByText('Clicked!')).toBeInTheDocument();});
In this example, the test renders MyComponent, clicks a button, and asserts that the text 'Clicked!' is present.
47. How do getBy, queryBy, and findBy differ in component tests?
getBy returns an existing match and throws if none is found. queryBy returns null when no match exists, useful for asserting absence. findBy returns a Promise that retries until a match appears or times out.
The singular variants require exactly one match: synchronous queries throw on multiple matches, while findBy retries and rejects if that condition still fails at the timeout. Use the AllBy versions when multiple elements are expected. Choose the query based on whether the UI should exist now, be absent, or appear later. See query types.
Practice the related React quiz →
Experienced
Experienced developers with 2–5 years of experience: practice diagnosing bugs, coordinating async UI, and choosing patterns for features you can own end to end.
Effects, refs, and state patterns
48. What is the difference between useEffect and useLayoutEffect in React?
useEffect and useLayoutEffect both handle side effects in React functional components but differ in when they run:
useEffectruns asynchronously after the DOM has rendered, making it suitable for tasks like data fetching or subscriptions.useLayoutEffectruns synchronously after DOM updates but before the browser paints, ideal for tasks like measuring DOM elements or aligning the UI with the DOM. Example:
import React, { useEffect, useLayoutEffect, useRef } from 'react';function Example() {const ref = useRef();useEffect(() => {console.log('useEffect: Runs after DOM paint');});useLayoutEffect(() => {console.log('useLayoutEffect: Runs before DOM paint');console.log('Element width:', ref.current.offsetWidth);});return <div ref={ref}>Hello</div>;}
Find in-depth explanations and track study progress here ->
49. What is the purpose of callback function argument format of setState() in React class components and when should it be used?
This applies to class components, which are no longer the recommended pattern. The function-component equivalent (the updater form of useState) is shown at the end.
The callback (updater) form of setState() ensures state updates are based on the most current state and props. This matters when the new state depends on the previous state, because React may batch multiple updates and the this.state you'd read directly could be stale.
this.setState((prevState, props) => ({counter: prevState.counter + props.increment,}));
The function-component equivalent uses the updater form of useState:
const [counter, setCounter] = useState(0);setCounter((prev) => prev + props.increment);
Find in-depth explanations and track study progress here ->
50. Explain the React component lifecycle methods in class components.
Class lifecycle methods only apply to class components, which are no longer the recommended pattern. The function-component equivalents (using useEffect) are shown at the end.
React class components have lifecycle methods for different phases:
Mounting:
constructor: Initializes state or binds methodscomponentDidMount: Runs after the component mounts, useful for API calls or subscriptions
componentDidMount() {console.log('Component mounted');}
Updating:
shouldComponentUpdate: Determines if the component should re-rendercomponentDidUpdate: Runs after updates, useful for side effects
Unmounting:
componentWillUnmount: Cleans up (e.g., removing event listeners).
componentWillUnmount() {console.log('Component will unmount');}
In function components, all of the above are expressed with useEffect:
useEffect(() => {// componentDidMount + componentDidUpdateconsole.log('Mounted or updated');return () => {// componentWillUnmountconsole.log('Will unmount');};},[/* deps */],);
51. What are Pure Components?
Pure Components in React are components that only re-render when their props or state change. They use shallow comparison to check if the props or state have changed, preventing unnecessary re-renders and improving performance.
- Class components can extend
React.PureComponentto become pure - Functional components can use
React.memofor the same effect
const PureFunctionalExample = React.memo(function ({ value }) {return <div>{value}</div>;});
With the React Compiler, manual memoization with React.memo, useMemo, and useCallback is rarely needed; the compiler inserts equivalent memoization automatically.
52. What is the useCallback hook in React and when should it be used?
The useCallback hook memoizes functions to prevent their recreation on every render. This is especially beneficial when passing callbacks to optimized child components that depend on reference equality to avoid unnecessary renders. Use it when a function is passed as a prop to a memoized child component.
const memoizedCallback = useCallback(() => {doSomething(a, b);}, [a, b]);
With the React Compiler enabled, you rarely need useCallback manually; the compiler inserts equivalent memoization automatically.
Find in-depth explanations and track study progress here ->
53. What is the useMemo hook in React and when should it be used?
The useMemo hook memoizes costly calculations, recomputing them only when dependencies change. This enhances performance by avoiding unnecessary recalculations. It should be used for computationally intensive functions that don't need to run on every render.
const memoizedValue = useMemo(() => computeExpensiveValue(a, b), [a, b]);
With the React Compiler enabled, you rarely need useMemo manually; the compiler memoizes derived values automatically.
Find in-depth explanations and track study progress here ->
54. What is the useReducer hook in React and when should it be used?
The useReducer hook manages complex state logic in functional components, serving as an alternative to useState. It's ideal when state has multiple fields (and there are constraints around how they should be mutated), or when the next state relies on the previous one.
The useReducer hook accepts a reducer function + an initial state. The reducer function is passed the current state and action and returns a new state.
const [state, dispatch] = useReducer(reducer, initialState);
Find in-depth explanations and track study progress here ->
55. What is forwardRef() in React used for?
Before React 19, function components didn't accept ref as a regular prop, so forwardRef() was used to pass a ref through to a child DOM element.
// Pre-React 19import React, { forwardRef } from 'react';const MyComponent = forwardRef((props, ref) => <input ref={ref} {...props} />);
In React 19, ref is a regular prop on function components and forwardRef is deprecated. Destructure it from props:
function MyComponent({ ref, ...props }) {return <input ref={ref} {...props} />;}
Find in-depth explanations and track study progress here ->
56. When should you use a class component over a function component?
Default to function components. Class components are legacy: new APIs like Suspense data fetching, the use hook, Actions, Server Components, and the React Compiler are designed for function components only. The one remaining reason to write a class today is implementing an error boundary, which still requires static getDerivedStateFromError / componentDidCatch.
57. What is the difference between createElement and cloneElement?
The difference between createElement and cloneElement in React is as follows:
createElement:
- Used to create a new React element.
- It takes the type of the element (e.g., 'div', a React component), props, and children, and returns a new React element.
- Commonly used internally by JSX or when dynamically creating elements. Example:
React.createElement('div', { className: 'container' }, 'Hello World');
cloneElement:
- Used to clone an existing React element and optionally modify its props.
- It allows you to clone a React element and pass new props or override the existing ones, keeping the original element's children and state.
- Useful when you want to manipulate an element without recreating it. Example:
const element = <button className="btn">Click Me</button>;const clonedElement = React.cloneElement(element, { className: 'btn-primary' });
58. What is React strict mode and what are its benefits?
React Strict Mode is a development feature in React that activates extra checks and warnings to help identify potential issues in your app.
- Detects unsafe lifecycles: Warns about deprecated lifecycle methods
- Identifies side effects: Highlights components with side effects in render methods
- Warns about unexpected state changes: Catches unexpected state mutations
- Enforces best practices: Flags potential problems, encouraging modern practices
<React.StrictMode><App /></React.StrictMode>
Wrapping components in <React.StrictMode> activates these development checks without affecting production builds.
59. What are some React anti-patterns?
React anti-patterns are practices that can lead to inefficient or hard-to-maintain code. Common examples include:
- Directly mutating state instead of using the state setter
- Using
useEffectto derive state from props (compute it during render instead) - Putting data into state that you can compute from other state or props
- Not using keys in lists, or using the array index as a key for reorderable lists
- Effects with missing or stale dependencies
- Deeply nested state; prefer flat shapes with
useReduceror a state library - Reading or writing refs during render (do it in effects or event handlers)
- Using
useStatefor values that don't drive rendering (useuseRefinstead) - Calling hooks conditionally or inside loops (breaks the Rules of Hooks)
The older class-component anti-patterns (using componentWillMount for data fetching or relying on componentWillReceiveProps) refer to APIs that were renamed to UNSAFE_* and no longer apply to function-component code.
Find in-depth explanations and track study progress here ->
60. What are higher-order components in React?
Higher-order components (HOCs) are functions that take a component and return a new one with added props or behavior, facilitating logic reuse across components.
const withExtraProps = (WrappedComponent) => {return (props) => <WrappedComponent {...props} extraProp="value" />;};const EnhancedComponent = withExtraProps(MyComponent);
HOCs were the dominant pattern for cross-cutting logic (auth, data fetching, theming) before hooks. Custom hooks cover almost all of those use cases now without the wrapper-component nesting. HOCs still appear in older codebases and some libraries (e.g., connect from react-redux), but new code should prefer a custom hook.
Find in-depth explanations and track study progress here ->
61. Explain the presentational vs container component pattern in React
The presentational vs container pattern split components into two roles: presentational components handled rendering (markup, styling) and received data via props, while container components handled state, data fetching, and behavior, then passed data down.
// Container: handles state/datafunction UserListContainer() {const [users, setUsers] = useState([]);useEffect(() => {fetchUsers().then(setUsers);}, []);return <UserList users={users} />;}// Presentational: pure renderingfunction UserList({ users }) {return (<ul>{users.map((u) => (<li key={u.id}>{u.name}</li>))}</ul>);}
This pattern was popular before hooks; its original author (Dan Abramov) has since said it's no longer worth following as a hard rule. With hooks, the same separation is usually expressed by extracting a custom hook (e.g., useUsers()) rather than a wrapper component. New code typically blends the two roles into a single component plus a custom hook.
Find in-depth explanations and track study progress here ->
62. What are render props in React?
Render props in React allow code sharing between components through a prop that is a function. This function returns a React element, enabling data to be passed to child components.
function DataFetcher({ url, render }) {const [data, setData] = useState(null);useEffect(() => {fetch(url).then((res) => res.json()).then(setData);}, [url]);return render(data);}// Usage<DataFetcherurl="/api/data"render={(data) => <div>{data ? data.name : 'Loading...'}</div>}/>;
Like HOCs, render props were a pre-hooks solution for sharing stateful logic. Most of those use cases are now solved with a custom hook (const data = useFetch(url)), which composes more naturally and avoids the render-prop pyramid. Render props are still useful in narrow cases where the consumer needs to control what to render based on parent-managed state (e.g., headless component libraries).
Find in-depth explanations and track study progress here ->
63. How do you re-render the view when the browser is resized?
To re-render the view on browser resize, use the useEffect hook to listen for the resize event and update state.
Example:
import React, { useState, useEffect } from 'react';function ResizeComponent() {const [windowWidth, setWindowWidth] = useState(window.innerWidth);useEffect(() => {const handleResize = () => setWindowWidth(window.innerWidth);window.addEventListener('resize', handleResize);return () => window.removeEventListener('resize', handleResize);}, []);return <div>Window width: {windowWidth}px</div>;}export default ResizeComponent;
This updates the state and re-renders the component whenever the window is resized.
64. How can a key reset a form when the selected record changes?
Render <Editor key={record.id} record={record} /> when switching records should discard the editor's local draft. A changed key makes React create a new component instance rather than preserve the old state.
Use this deliberately: remounting also resets focus, refs, and Effects. If drafts should survive switching records, store them by record ID outside the remounted editor. See resetting state with a key.
Practice the related React quiz →
65. When should you calculate a value during render instead of using an Effect?
If a value is derived entirely from current props or state, compute it during render: const fullName = firstName + ' ' + lastName. Setting it from an Effect adds another render and permits inconsistent intermediate state.
Use an Effect when synchronizing with something outside React, such as a connection. Memoize a derived calculation only when its cost warrants it. See removing unnecessary Effects.
Practice the related React quiz →
66. What should happen to a subscription when an Effect dependency changes?
If an Effect connects to roomId, changing that ID should disconnect the old room before connecting the new one. Return cleanup from setup and include the reactive inputs the connection uses.
Test the sequence “connect A, disconnect A, connect B, disconnect B on unmount.” Cleanup must mirror setup, including when development checks exercise it more than once. See Effect lifecycle.
Practice the related React quiz →
67. How would you prevent an old request from overwriting newer search results?
Give each Effect execution a cleanup guard or request identity and ignore obsolete responses. Abort supported requests too, but do not assume abort reverses server work.
useEffect(() => {let active = true;const controller = new AbortController();setResult({ status: "loading" });async function load() {try {const response = await fetch(`/api/search?q=${encodeURIComponent(query)}`,{signal: controller.signal,},);if (!response.ok) throw new Error(`HTTP ${response.status}`);const data = await response.json();if (active) setResult({ status: "success", data });} catch (error) {if (active) setResult({ status: "error", error });}}load();return () => {active = false;controller.abort();};}, [query]);
This excerpt belongs inside a component with query and result state. See request cancellation.
Practice the related React quiz →
68. Why does an interval sometimes keep reading the initial state?
The interval callback closes over values from the render that created it. An Effect with [] will not install a new callback when those values change.
For a counter, use setCount(c => c + 1) inside the interval and clear it in cleanup. If the subscription truly depends on another value, include that dependency. Do not suppress the linter to hide stale data. See removing Effect dependencies.
Practice the related React quiz →
69. When would you use useImperativeHandle?
Use it to expose a small imperative API through a ref, such as focus() or scrollToItem(), instead of exposing every detail of an internal DOM node. Include reactive values used by the handle in its dependencies.
Prefer props for declarative behavior such as whether a panel is open. In React 19, a function component can receive the ref as a prop; older versions require forwardRef. See useImperativeHandle.
Practice the related React quiz →
70. How can TypeScript prevent impossible component prop combinations?
Use a discriminated union so each mode has its own required props:
type FieldProps =| { mode: "editable"; value: string; onChange: (value: string) => void }| { mode: "readonly"; value: string; onChange?: never };
After checking props.mode, TypeScript narrows the allowed properties. This communicates the component contract better than making every property optional. Runtime data still requires validation. See TypeScript discriminated unions.
Rendering, data loading, and React 19 forms
71. How does virtual DOM in React work? What are its benefits and downsides?
The virtual DOM in React is an in-memory representation of the real DOM. When state or props change, React creates a new virtual DOM tree, compares it to the previous one using a diffing algorithm, and efficiently updates only the parts of the real DOM that changed.
- Benefits: It improves performance by reducing costly direct DOM manipulations and makes UI updates declarative and predictable.
- Downsides: There's some overhead from diffing and extra memory usage, and in very dynamic UIs, it may not always outperform manual optimizations.
Find in-depth explanations and track study progress here ->
72. What is reconciliation?
Reconciliation is the process by which React updates the DOM to match the virtual DOM efficiently. It involves comparing the new virtual DOM tree with the previous one and determining the minimum number of changes required to update the actual DOM. This process ensures optimal performance by avoiding unnecessary re-renders.
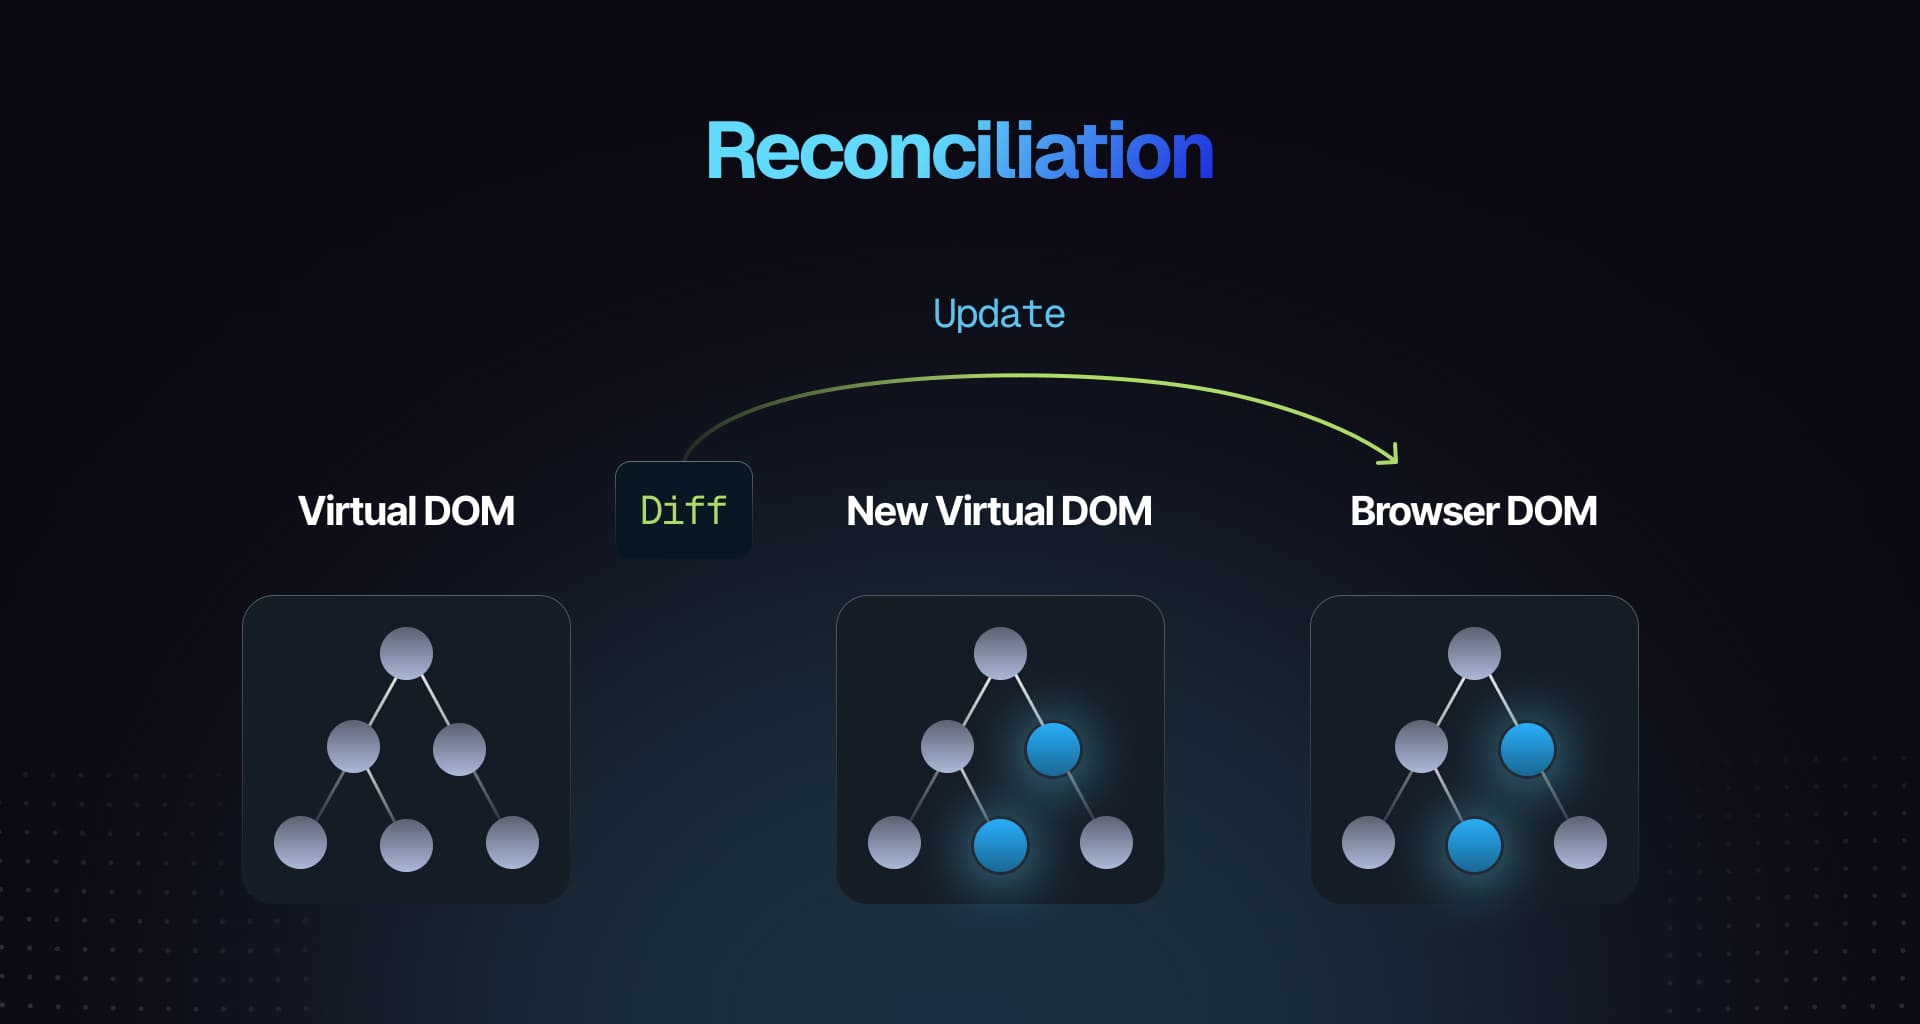
Find in-depth explanations and track study progress here ->
73. What are error boundaries in React for?
Error boundaries catch JavaScript errors in their child components, log them, and display fallback UI instead of crashing the application. They utilize componentDidCatch and static getDerivedStateFromError methods but do not catch errors in event handlers or asynchronous code.
Find in-depth explanations and track study progress here ->
74. What is React Suspense?
React Suspense allows handling asynchronous operations more elegantly within components. It provides fallback content while waiting for resources like data or code to load. You can use it alongside React.lazy() for code splitting.
const LazyComponent = React.lazy(() => import('./LazyComponent'));function MyComponent() {return (<React.Suspense fallback={<div>Loading...</div>}><LazyComponent /></React.Suspense>);}
Find in-depth explanations and track study progress here ->
75. What is code splitting in a React application?
Code splitting enhances performance by dividing code into smaller chunks loaded on demand, thereby reducing initial load times. This can be achieved through dynamic import() statements or using React's React.lazy and Suspense.
// Using React.lazy and Suspenseconst LazyComponent = React.lazy(() => import('./LazyComponent'));function App() {return (<React.Suspense fallback={<div>Loading...</div>}><LazyComponent /></React.Suspense>);}
Find in-depth explanations and track study progress here ->
76. Describe lazy loading in React
Lazy loading in React is a technique where components are loaded only when they are needed, rather than at the initial page load. This helps reduce the initial load time and improve performance by splitting the code into smaller chunks.
Example:
import React, { Suspense, lazy } from 'react';const LazyComponent = lazy(() => import('./LazyComponent'));function App() {return (<Suspense fallback={<div>Loading...</div>}><LazyComponent /></Suspense>);}
In this example, LazyComponent is loaded only when it's rendered, and while loading, a fallback UI (Loading...) is displayed.
77. How do you handle asynchronous data loading in React applications?
Asynchronous data loading uses useEffect alongside useState hooks; fetching data inside useEffect updates state with fetched results ensuring re-renders occur with new data.
import React, { useState, useEffect } from 'react';const FetchAndDisplayData = () => {const [info, updateInfo] = useState(null);const [isLoading, toggleLoading] = useState(true);useEffect(() => {const retrieveData = async () => {try {const res = await fetch('https://api.example.com/data');const data = await res.json();updateInfo(data);} catch (err) {console.error('Error fetching data:', err);} finally {toggleLoading(false);}};retrieveData();}, []);return (<div>{isLoading ? (<p>Fetching data, please wait...</p>) : (<pre>{JSON.stringify(info, null, 2)}</pre>)}</div>);};export default FetchAndDisplayData;
Find in-depth explanations and track study progress here ->
78. What are some common pitfalls when doing data fetching in React?
Common pitfalls in data fetching with React include failing to handle loading and error states, neglecting to clean up subscriptions which can cause memory leaks, and improperly using lifecycle methods or hooks. Always ensure proper handling of these states, clean up after components, and utilize useEffect for side effects in functional components.
Find in-depth explanations and track study progress here ->
79. What's new in React 19?
React 19 adds:
- Actions: functions that wrap async work and produce pending/error/data state via new hooks.
- The
usehook: reads promises and context during render. - Stable React Server Components and Server Actions.
- Native support for
<form action={fn}>. refas a regular prop on function components (no moreforwardRef).- Hoisting of
<title>,<meta>, and stylesheets out of JSX. - The React Compiler: an opt-in build-time optimizer that auto-memoizes.
Together, these move data mutations and async UI state into React itself, instead of leaving them as patterns each app reinvents.
80. What are Actions in React 19?
By convention, an Action is an async function passed to a React API that runs it inside a transition: useActionState, startTransition (from useTransition), or a <form action={...}> prop. React tracks pending state, surfaces errors, and applies updates inside a transition so the UI stays responsive. This removes the usual boilerplate of toggling a loading flag, wrapping in try/catch, and managing error and data state separately.
import { useActionState } from 'react';async function updateName(prevState, formData) {const name = formData.get('name');const error = await saveName(name);if (error) return { error };return { name };}function NameForm() {const [state, dispatchAction, isPending] = useActionState(updateName, {name: '',});return (<form action={dispatchAction}><input name="name" defaultValue={state.name} /><button disabled={isPending}>Save</button>{state.error && <p>{state.error}</p>}</form>);}
81. What does the useActionState hook do?
useActionState takes an action function and an initial state, and returns [state, dispatchAction, isPending]. Calling dispatchAction (usually by passing it to <form action>) runs the action, marks isPending true, and replaces the state with the action's return value when it resolves. One hook covers what you'd otherwise write as three separate useState calls for data, loading, and error.
82. What does useOptimistic do?
useOptimistic renders an optimistic version of state immediately while an action is in flight, then automatically reverts to the real state when the action settles. Useful for chat messages, likes, list reordering, or anywhere the network round-trip would feel laggy.
import { useOptimistic } from 'react';function MessageList({ messages, sendMessage }) {const [optimisticMessages, addOptimistic] = useOptimistic(messages,(state, newMessage) => [...state, { text: newMessage, sending: true }],);async function handleSend(formData) {const text = formData.get('text');addOptimistic(text);await sendMessage(text);}return (<>{optimisticMessages.map((m, i) => (<p key={i} style={{ opacity: m.sending ? 0.5 : 1 }}>{m.text}</p>))}<form action={handleSend}><input name="text" /></form></>);}
83. What is the use hook and how is it different from useEffect + fetch?
use reads the value of a Promise or Context during render. When given a Promise, it suspends the component until the promise resolves (handled by the nearest <Suspense> boundary) and then returns the resolved value. Unlike useEffect, use can be called conditionally and inside loops, and the resolved data is available synchronously after suspension, so there's no loading state to thread through the tree.
import { use, Suspense } from 'react';function Profile({ userPromise }) {const user = use(userPromise); // suspends until resolvedreturn <h1>{user.name}</h1>;}// Server Component: render runs once per request, so the promise is stable.// In a Client Component, create the promise outside render (or via `cache()`)// to avoid making a new one on every re-render.async function Page() {const userPromise = fetchUser();return (<Suspense fallback={<p>Loading...</p>}><Profile userPromise={userPromise} /></Suspense>);}
84. How does the new form action prop work in React 19?
React 19 lets you pass a function directly to <form action> (and <button formAction>). React calls the function with a FormData argument when the form is submitted, runs it inside a transition, and resets uncontrolled inputs on success. Combine it with useActionState or useFormStatus for pending state and error handling without manual onSubmit plumbing.
import { useFormStatus } from 'react-dom';function SubmitButton() {const { pending } = useFormStatus();return <button disabled={pending}>{pending ? 'Saving...' : 'Save'}</button>;}function ProfileForm() {async function save(formData) {await updateProfile(Object.fromEntries(formData));}return (<form action={save}><input name="name" /><SubmitButton /></form>);}
85. Why might useFormStatus always report pending: false?
The Hook reads the status of a parent form. Calling it in the same component that returns the form does not subscribe to that form; move it into a child rendered inside the form.
import { useFormStatus } from "react-dom";function SubmitButton() {const { pending } = useFormStatus();return (<button type="submit" disabled={pending}>{pending ? "Saving…" : "Save"}</button>);}
Render this beneath <form action={save}>. See useFormStatus.
86. How do deferred rendering and debouncing differ for search?
A deferred value lets React prioritize urgent UI while preparing results for a newer value. It has no fixed delay and does not by itself reduce the number of network requests.
Debouncing waits for a quiet interval before starting work, which can reduce requests but adds intentional latency. Use request cancellation or stale-response protection with either approach; keeping typing responsive does not guarantee that the latest response wins. See deferred values and requests.
Routing and navigation behavior
87. How do you handle nested routes and route parameters in React Router?
Nested routes allow you to create hierarchies of components, and useParams helps access dynamic route parameters.
Key techniques:
<Outlet>: Renders child routes within a parent layoutuseParams: Retrieves route parameters for dynamic routing
import {BrowserRouter,Routes,Route,Outlet,useParams,} from 'react-router-dom';function UserProfile() {const { userId } = useParams();return <h2>User ID: {userId}</h2>;}function App() {return (<BrowserRouter><Routes><Route path="user/:userId" element={<Outlet />}><Route path="profile" element={<UserProfile />} /></Route></Routes></BrowserRouter>);}
88. What is the difference between BrowserRouter and HashRouter?
- BrowserRouter: Uses the HTML5 History API to manage navigation, enabling clean URLs without the hash (
#). It requires server-side configuration to handle routes correctly, especially for deep linking. - HashRouter: Uses the hash (
#) portion of the URL to simulate navigation. It doesn't require server-side configuration, as the hash is never sent to the server. This makes it suitable for environments where server-side routing isn't possible (e.g., static hosting).
89. How React Router is different from the history library?
React Router is a routing library for React that provides a declarative API for defining routes and handling navigation. It manages components and URLs.
History library is a lower-level utility that only manages browser history (e.g., pushing and popping history entries). It doesn't handle UI rendering or routing, making it more generic and not React-specific.
React Router uses the history library internally but adds additional features like routing and component management.
90. What are the <Router> components of React Router v6?
In React Router v6, the key <Router> components are:
<BrowserRouter>: Uses the HTML5 history API to keep the UI in sync with the URL. It's commonly used for web applications.<HashRouter>: Uses URL hash fragments (#) to manage routing, making it suitable for static file hosting or legacy browsers that don't support the HTML5 history API.<MemoryRouter>: Keeps the URL in memory (no address bar changes), useful for non-browser environments like tests or embedded apps.<StaticRouter>: Used for server-side rendering (SSR), where routing is handled without a browser, typically in Node.js environments.
Each of these routers serves different use cases but provides the same routing functionality within a React app.
91. What is the purpose of the push and replace methods of history?
The push and replace methods of the history library are used to manage the browser's history stack and control navigation.
push:
- Adds a new entry to the history stack, which means the user can navigate back to it using the browser's back button.
- Example:
history.push('/new-page')
replace:
- Replaces the current entry in the history stack with a new one, meaning the user cannot go back to the previous page using the back button.
- Example:
history.replace('/new-page')
92. How would you implement route guards or private routes in React?
To implement private routes, create a component that checks if the user is authenticated before rendering the desired route.
Example:
import { Navigate } from 'react-router-dom';function PrivateRoute({ children }) {return isAuthenticated ? children : <Navigate to="/login" />;}
PrivateRoute: Checks authentication and either renders the children (protected routes) or redirects to the login page.<Navigate>: Replaces the deprecated<Redirect>for redirecting in React Router v6+.
93. How do you handle 404 errors or page not found in React Router?
To handle 404 errors or page not found in React Router, create a catch-all route at the end of your route configuration that renders a custom 404 component.
Example:
import { Routes, Route } from 'react-router-dom';function NotFound() {return <h1>404 - Page Not Found</h1>;}function App() {return (<Routes><Route path="/" element={<Home />} /><Route path="/about" element={<About />} /><Route path="*" element={<NotFound />} /></Routes>);}
In this example, the NotFound component is rendered when no other routes match the URL, indicating a 404 error.
94. How do you perform an automatic redirect after login in React Router?
To perform an automatic redirect after login in React Router, use the useNavigate hook to navigate to the desired route after successful authentication.
Example:
import { useNavigate } from 'react-router-dom';function Login() {const navigate = useNavigate();const handleLogin = () => {// Perform login logicnavigate('/dashboard');};return (<div><button onClick={handleLogin}>Login</button></div>);}
In this example, the handleLogin function navigates to the /dashboard route after successful login.
95. Which state belongs in the URL rather than only in React state?
Put shareable, navigable choices such as search terms, filters, sorting, and pagination in the URL when Back, refresh, and copied links should reproduce the view. Keep transient interaction details such as hover or an unfinished password outside it.
Parse and validate values, supply defaults, and choose push versus replace based on the desired history behavior. Avoid duplicating URL state into local state without a clear synchronization policy. See React Router state management.
96. How do React Router declarative, data, and framework modes differ?
Declarative mode supplies URL matching and navigation through components such as BrowserRouter. Data mode adds route loaders, actions, and pending-state coordination through a data router. Framework mode adds build integration and route-module conventions, including rendering strategy support.
Choose the mode before proposing a loader or server-rendering API. A component under plain BrowserRouter does not gain data-router capabilities simply by calling a data Hook. See choosing a mode.
Internationalization and accessible interfaces
97. What are React Portals used for?
React Portals allow rendering children into a DOM node outside the parent component's hierarchy. This is useful for modals or tooltips that need to escape parent overflow or z-index constraints.
Find in-depth explanations and track study progress here ->
98. How do you localize React applications?
Localization typically involves libraries like react-i18next or react-intl. Set up translation files for different languages and configure the library within your app using provided hooks or components.
// Example using react-i18nextimport { useTranslation } from 'react-i18next';const MyComponent = () => {const { t } = useTranslation();return <p>{t('welcome_message')}</p>;};
Find in-depth explanations and track study progress here ->
99. What is react-intl?
react-intl is a library that provides internationalization (i18n) support for React applications. It helps in formatting numbers, dates, strings, and handling translation/localization. It integrates with the Intl API in JavaScript to provide locale-specific data and translation management.
100. What are the main features of react-intl?
- Formatted text: Helps in formatting messages and strings with placeholders.
- Number formatting: Allows for formatting numbers, currencies, and percentages according to the locale.
- Date and time formatting: Helps in formatting dates and times in various formats based on the locale.
- Plural and gender support: Provides plural and gender-aware string formatting.
101. What are the two ways of formatting in react-intl?
- Component-based formatting: Using React components like
<FormattedMessage />,<FormattedNumber />,<FormattedDate />, etc., to format content. - Hook-based formatting: Using hooks like
useIntlfor formatting messages, numbers, or dates imperatively within components.
102. How to use FormattedMessage as a placeholder using react-intl?
You can use the FormattedMessage component to handle placeholders within strings. Placeholders are replaced dynamically with variables in the translated string.
import { FormattedMessage } from 'react-intl';function WelcomeMessage() {return (<FormattedMessageid="welcome"defaultMessage="Hello, {name}!"values={{ name: 'John' }}/>);}
Here, {name} is a placeholder, and John will replace it.
103. How to access the current locale with React Intl?
You can access the current locale using the useIntl hook or the IntlProvider's locale prop.
Using useIntl:
import { useIntl } from 'react-intl';function LocaleDisplay() {const intl = useIntl();return <div>Current locale: {intl.locale}</div>;}
Using IntlProvider:
<IntlProvider locale="en" messages={messages}><MyComponent /></IntlProvider>
Here, locale="en" defines the current locale.
104. How to format date using react-intl?
You can format dates using the <FormattedDate /> component or the useIntl hook's formatDate method.
Using <FormattedDate /> component:
import { FormattedDate } from 'react-intl';function DateComponent() {return (<FormattedDatevalue={new Date()}year="numeric"month="long"day="2-digit"/>);}
Using useIntl hook:
import { useIntl } from 'react-intl';function DateComponent() {const intl = useIntl();const formattedDate = intl.formatDate(new Date(), {year: 'numeric',month: 'long',day: '2-digit',});return <div>{formattedDate}</div>;}
These methods allow you to format the date in a locale-sensitive manner.
105. What makes a portal-based modal accessible?
Use a native modal dialog or appropriate role="dialog" and aria-modal="true" semantics. Give the dialog an accessible name, move focus inside when it opens, keep keyboard focus within a modal, support Escape, and restore focus appropriately when it closes. Prevent interaction with background content while the modal is active.
A portal only changes DOM placement. Prefer a tested dialog primitive, then verify its keyboard behavior and labeling in the actual application. See the WAI-ARIA modal dialog pattern.
Practice the related React quiz →
106. How would you make form validation usable with a keyboard and screen reader?
Use visible labels connected to controls, associate error text with its input using aria-describedby, and set aria-invalid when a value is invalid. Preserve entered data after failure and provide clear guidance for correction.
On submission failure, consider an error summary or moving focus to the first invalid field. Do not communicate errors through color alone, and avoid announcing every keystroke as an urgent alert. See WAI form notifications.
Testing asynchronous behavior
107. How do you test asynchronous code in React components?
To test asynchronous code in React components, you can use async/await with waitFor from React Testing Library to handle asynchronous operations like data fetching or API calls.
Example:
import { render, screen, waitFor } from '@testing-library/react';import MyComponent from './MyComponent';test('fetches data and renders it', async () => {render(<MyComponent />);await waitFor(() => {expect(screen.getByText('Data loaded')).toBeInTheDocument();});});
In this example, the test waits for the data to be loaded before asserting that the text 'Data loaded' is present.
108. How do you mock API calls in React component tests?
To mock API calls in React component tests, you can use Jest's jest.mock to mock the API module and return mock data. This allows you to simulate API responses without making actual network requests.
Example:
import { render, screen } from '@testing-library/react';jest.mock('./api', () => ({fetchData: jest.fn(() => Promise.resolve('mocked data')),}));import MyComponent from './MyComponent';test('fetches data and renders it', async () => {render(<MyComponent />);expect(screen.getByText('Loading...')).toBeInTheDocument();expect(await screen.findByText('mocked data')).toBeInTheDocument();});
In this example, the fetchData function from the api module is mocked to return 'mocked data' for testing purposes.
109. How do you test React hooks in functional components?
Render the hook inside a test using renderHook from @testing-library/react, then call act to drive any state updates.
import { renderHook, act } from '@testing-library/react';import useCounter from './useCounter';test('increments counter', () => {const { result } = renderHook(() => useCounter());act(() => {result.current.increment();});expect(result.current.count).toBe(1);});
Older sources import renderHook from @testing-library/react-hooks. That package was deprecated and merged into @testing-library/react in v13; use the import shown above.
110. How do you test custom hooks in React?
Same approach as above: render the hook with renderHook and assert on result.current. For hooks that depend on context (e.g., a router or theme provider), pass a wrapper option.
import { renderHook, act } from '@testing-library/react';import useCustomHook from './useCustomHook';test('hook behavior', () => {const { result } = renderHook(() => useCustomHook());act(() => {result.current.doSomething();});expect(result.current.value).toBe('expected value');});// With a context provider:const wrapper = ({ children }) => (<MyProvider value="test">{children}</MyProvider>);const { result } = renderHook(() => useCustomHook(), { wrapper });
111. What is Snapshot Testing in React?
Snapshot Testing in React is a testing technique that captures the rendered output of a component and saves it as a snapshot. Subsequent test runs compare the current output with the saved snapshot to detect any unexpected changes. If the output differs from the snapshot, the test fails, indicating that the component's output has changed.
Here's an example of using Snapshot Testing with Jest:
import React from 'react';import renderer from 'react-test-renderer';import MyComponent from './MyComponent';test('renders correctly', () => {const tree = renderer.create(<MyComponent />).toJSON();expect(tree).toMatchSnapshot();});
In this example, the renderer.create function renders the MyComponent and converts it to a JSON tree. The toMatchSnapshot function saves the snapshot of the component's output. Subsequent test runs compare the current output with the saved snapshot, ensuring the component's output remains consistent.
112. How do you test React components that use context?
To test React components that use context, you can wrap the component in a context provider with the desired context values for testing. This allows you to simulate the context values and test the component's behavior based on those values.
Example:
import { render } from '@testing-library/react';import { MyContextProvider } from './MyContextProvider';import MyComponent from './MyComponent';test('renders correctly with context', () => {const { getByText } = render(<MyContextProvider value="test value"><MyComponent /></MyContextProvider>,);expect(getByText('test value')).toBeInTheDocument();});
In this example, the MyComponent is wrapped in a MyContextProvider with a specific context value for testing. The test verifies that the component renders correctly with the provided context value.
113. How do you test React components that use Redux?
To test React components that use Redux, you can use the redux-mock-store library to create a mock store with the desired state for testing. This allows you to simulate the Redux store and test the component's behavior based on the state.
Example:
import { render } from '@testing-library/react';import configureStore from 'redux-mock-store';import { Provider } from 'react-redux';import MyComponent from './MyComponent';const mockStore = configureStore([]);test('renders correctly with Redux state', () => {const store = mockStore({ counter: 0 });const { getByText } = render(<Provider store={store}><MyComponent /></Provider>,);expect(getByText('Counter: 0')).toBeInTheDocument();});
In this example, the MyComponent is wrapped in a Provider with a mock Redux store containing the initial state { counter: 0 } for testing. The test verifies that the component renders correctly with the provided Redux state.
114. How would you test a debounced input without waiting in real time?
Enable the runner's fake timers, type through user-event, and advance the relevant delay inside act when it triggers React updates. Configure userEvent.setup({ advanceTimers: jest.advanceTimersByTime }) for Jest so its own scheduled work advances correctly.
Assert that no request occurs before the delay and that the final value is submitted afterward. Flush pending timers and restore real timers during cleanup. See Testing Library fake timers.
Practice the related React quiz →
Senior
Senior developers with 5+ years of experience: practice evaluating architecture, performance, failure recovery, and migration trade-offs across a React application.
Rendering, concurrency, and performance
115. What is React Fiber?
React Fiber is a complete rewrite of the React core algorithm, designed to improve performance and enable new features like async rendering, error boundaries, and incremental rendering. It breaks down the rendering process into smaller chunks, allowing React to pause, abort, or prioritize updates as needed.
Find in-depth explanations and track study progress here ->
116. How would one optimize the performance of React contexts to reduce rerenders?
Optimizing context performance involves memoizing context values with useMemo, splitting contexts for isolated state changes, and employing selectors to rerender only necessary components.
const value = useMemo(() => ({ state, dispatch }), [state, dispatch]);
Find in-depth explanations and track study progress here ->
117. What are concurrent features in React, and how do they improve rendering performance?
Concurrent features were introduced in React 18 (the experimental "Concurrent Mode" branding from React 17 is no longer used). They let React pause, interrupt, and resume rendering work instead of running it as a single blocking pass. This keeps the UI responsive: urgent updates like typing or clicks can preempt slower work like rendering a large list or filtering search results.
The features are opt-in via specific APIs (useTransition, useDeferredValue, and <Suspense> for data fetching), not a global mode switch.
118. How does React handle concurrent rendering with multiple updates and prioritize them?
React's scheduler assigns priority to updates based on how they're triggered. Updates from direct user interaction (click, input, focus) are treated as urgent and rendered synchronously. Updates wrapped in startTransition or read through useDeferredValue are non-urgent: React can interrupt them to handle a more urgent update, then resume. That's what allows a heavy filter or list render to coexist with typing into a search box without blocking it.
119. How would you handle long-running tasks or expensive computations in React applications without blocking the UI?
To avoid blocking the UI, use Web Workers, setTimeout, or requestIdleCallback for offloading heavy computations. Alternatively, break tasks into smaller parts and use React's Suspense or useMemo to only recompute when necessary.
Example using setTimeout for deferring computation:
const [data, setData] = useState(null);useEffect(() => {setTimeout(() => {const result = computeExpensiveData();setData(result);}, 0);}, []);
120. What is the React Compiler?
The React Compiler is an opt-in build-time tool that analyzes your components and automatically inserts memoization equivalent to useMemo, useCallback, and React.memo where it's safe. It removes the need for manual memoization in most cases. It enforces the Rules of React strictly: if your code violates them (e.g., mutating props, calling hooks conditionally), the compiler skips that component instead of producing incorrect output.
121. What's the difference between useTransition and useDeferredValue?
Both mark updates as non-urgent so React can keep the UI responsive. The difference is where you put the control:
useTransitionwraps the state setter at the call site. You decide when a particular update should be a transition (e.g., a search submit).useDeferredValuewraps a value at the consumer. It hands you a lagging copy of the value that updates after urgent renders, useful when the data source isn't under your control (e.g., a value coming through props).
// useTransition: control at the dispatch siteconst [isPending, startTransition] = useTransition();startTransition(() => setQuery(input));// useDeferredValue: control at the read siteconst deferredQuery = useDeferredValue(query);return <ExpensiveResults query={deferredQuery} />;
122. What problem does useSyncExternalStore solve?
It connects React to mutable state outside React through subscribe, getSnapshot, and optionally getServerSnapshot. It helps keep store reads consistent with React's rendering lifecycle.
Return a stable snapshot while the store is unchanged and a new immutable snapshot when it changes. For SSR, the server snapshot and initial hydration snapshot must agree. Returning a new object on every read can cause repeated updates. See useSyncExternalStore.
123. Why does wrapping an expensive calculation in startTransition still freeze typing?
The transition callback executes immediately. Running a long synchronous calculation inside it still blocks the main thread; only the state updates it marks receive transition scheduling.
Move CPU-bound computation to a worker or break it into yielding chunks. For expensive React rendering, isolate the dependent subtree so React can schedule it separately. Also remember that React 19 state updates after await currently need another startTransition to be marked as transitions. See transition caveats.
124. How would you investigate a React page that feels slow?
Reproduce a specific interaction on representative hardware and data. Use browser performance tools to separate network delays, long JavaScript tasks, layout, and paint from React rendering work. Use React DevTools or <Profiler> to identify costly component commits.
Measure before and after a targeted change. A render-count reduction is not enough if interaction latency remains unchanged, and development checks can distort measurements. See React Profiler.
Practice the related React quiz →
125. When should you virtualize a long list, and what can it break?
Virtualization mounts a moving window of rows rather than every item, reducing rendering and DOM costs for large lists. Consider it when measurement shows list size is the bottleneck, not simply because a list exists.
Handle stable item keys, variable heights, scroll position, and focus when rows leave the window. Unmounted content may be unavailable to browser find or crawlers, and accessibility needs testing. See TanStack Virtual.
126. How would you introduce React Compiler into an existing application?
First fix violations of the Rules of React and establish behavior tests and performance baselines. Enable the compiler in a controlled scope, inspect diagnostics, and compare representative interactions before expanding.
Do not delete every manual memoization call as the first step. Some code may rely incorrectly on identity, and some components may not compile. Confirm build configuration and library compatibility. See incremental compiler adoption.
127. Why can a component wrapped in React.memo still re-render?
By default, memo compares each prop with its previous value using Object.is. A newly created object, array, or callback counts as a changed prop even if its contents look the same. Updates to the component's own state or a context it reads can also trigger a render.
Start by identifying the changed input. Prefer simple props and local state; use useMemo or useCallback when stable references would avoid measured work. A custom comparator must account for every prop, including functions, or an event handler can keep an old closure. Memoization is a performance optimization, not a guarantee that React will never render the component. See React memo behavior and pitfalls.
Practice the related React quiz →
128. How do render and commit differ, and why must rendering stay pure?
During render, React calls components to calculate the next UI. During commit, React applies the required changes to the DOM. A component can render without causing a DOM change, and concurrent rendering can restart or discard unfinished render work before commit.
For example, sending an analytics request from a component's body can report an event for UI that never appeared. Put interaction-specific work in event handlers and synchronization in Effects, with cleanup where needed. Rendering should not mutate props, state, or pre-existing external objects. See render and commit and component purity.
Practice the related React quiz →
Server rendering and data architecture
129. Explain what React hydration is?
Hydration involves attaching event listeners and making server-rendered HTML interactive on the client side. After server-side rendering, React initializes dynamic behavior by attaching event handlers.
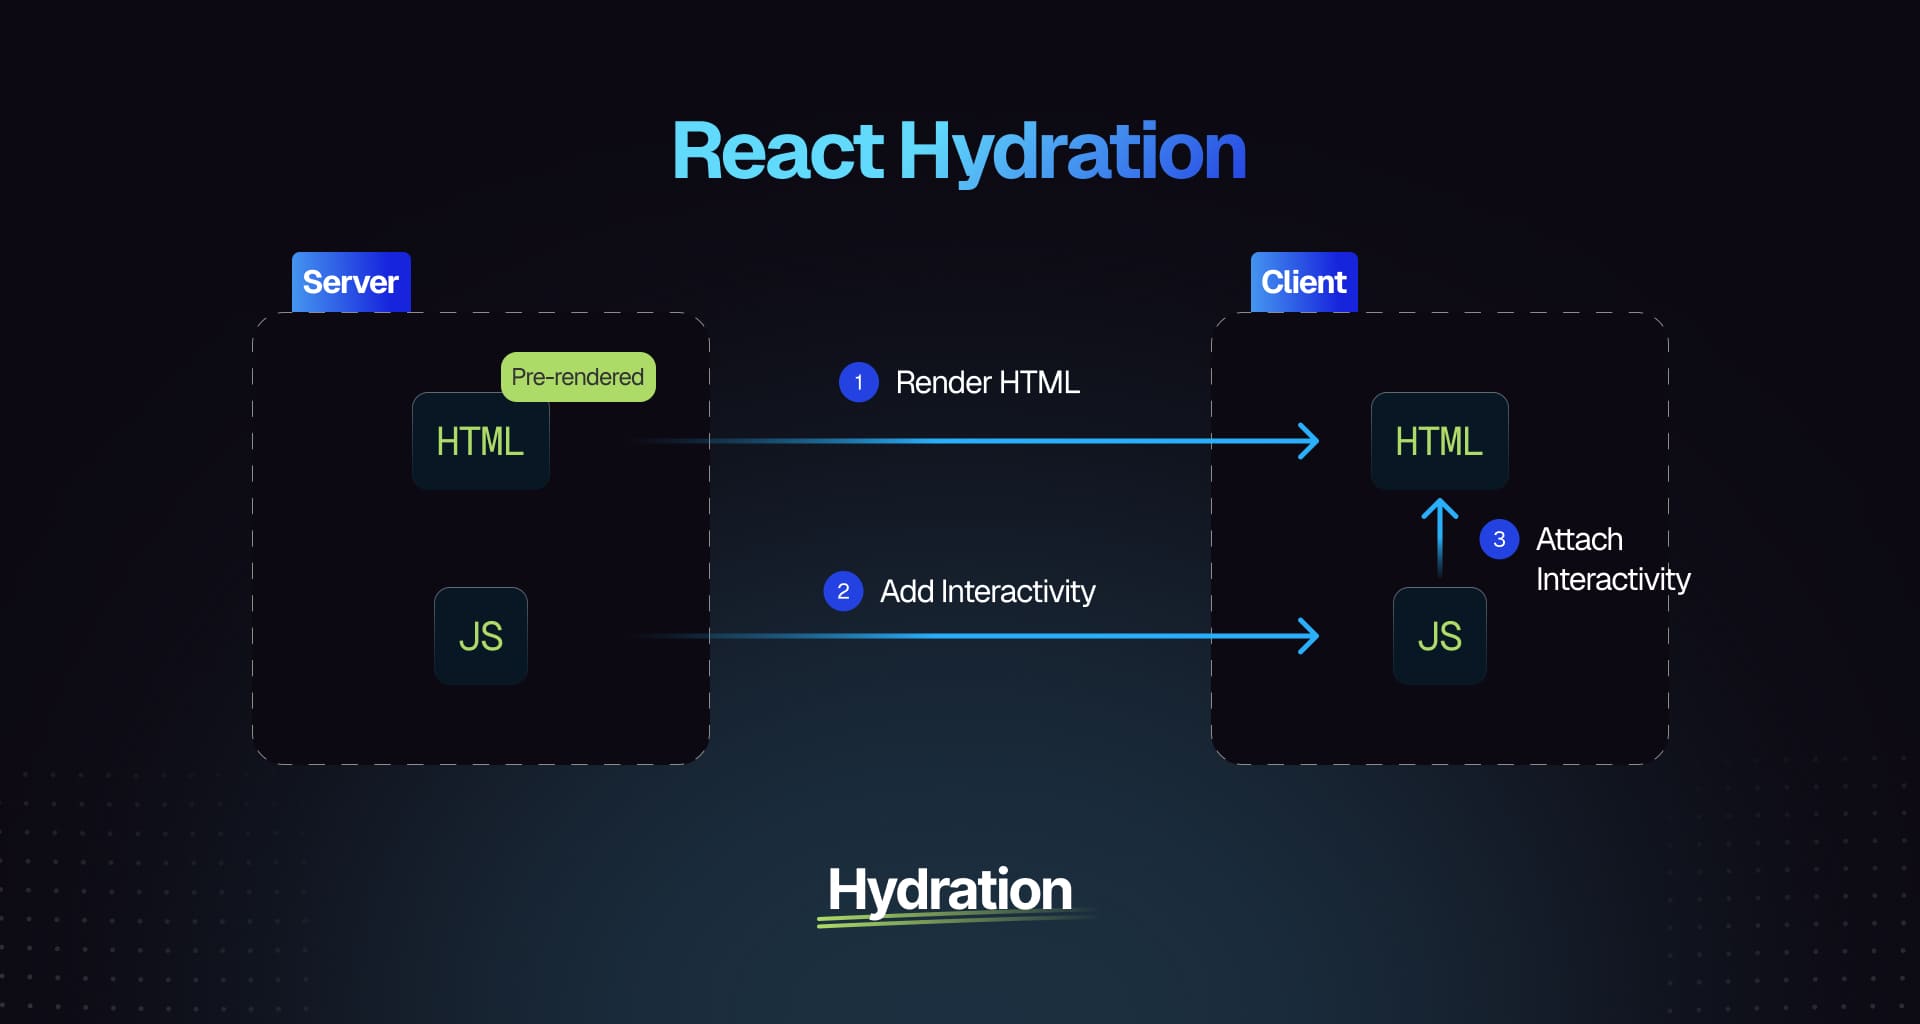
Find in-depth explanations and track study progress here ->
130. How do you decide between using React state, context, and external state managers?
Choosing between React state, context, and external state managers depends on your application's complexity. Use React state for local component state, context for global state shared across multiple components, and external managers like Redux or MobX for complex state management requiring advanced features like optimizing re-renders.
Find in-depth explanations and track study progress here ->
131. Explain server-side rendering of React applications and its benefits
Server-side rendering (SSR) involves rendering components on the server before sending fully rendered HTML to clients, improving initial load times and SEO through efficient hydration processes.
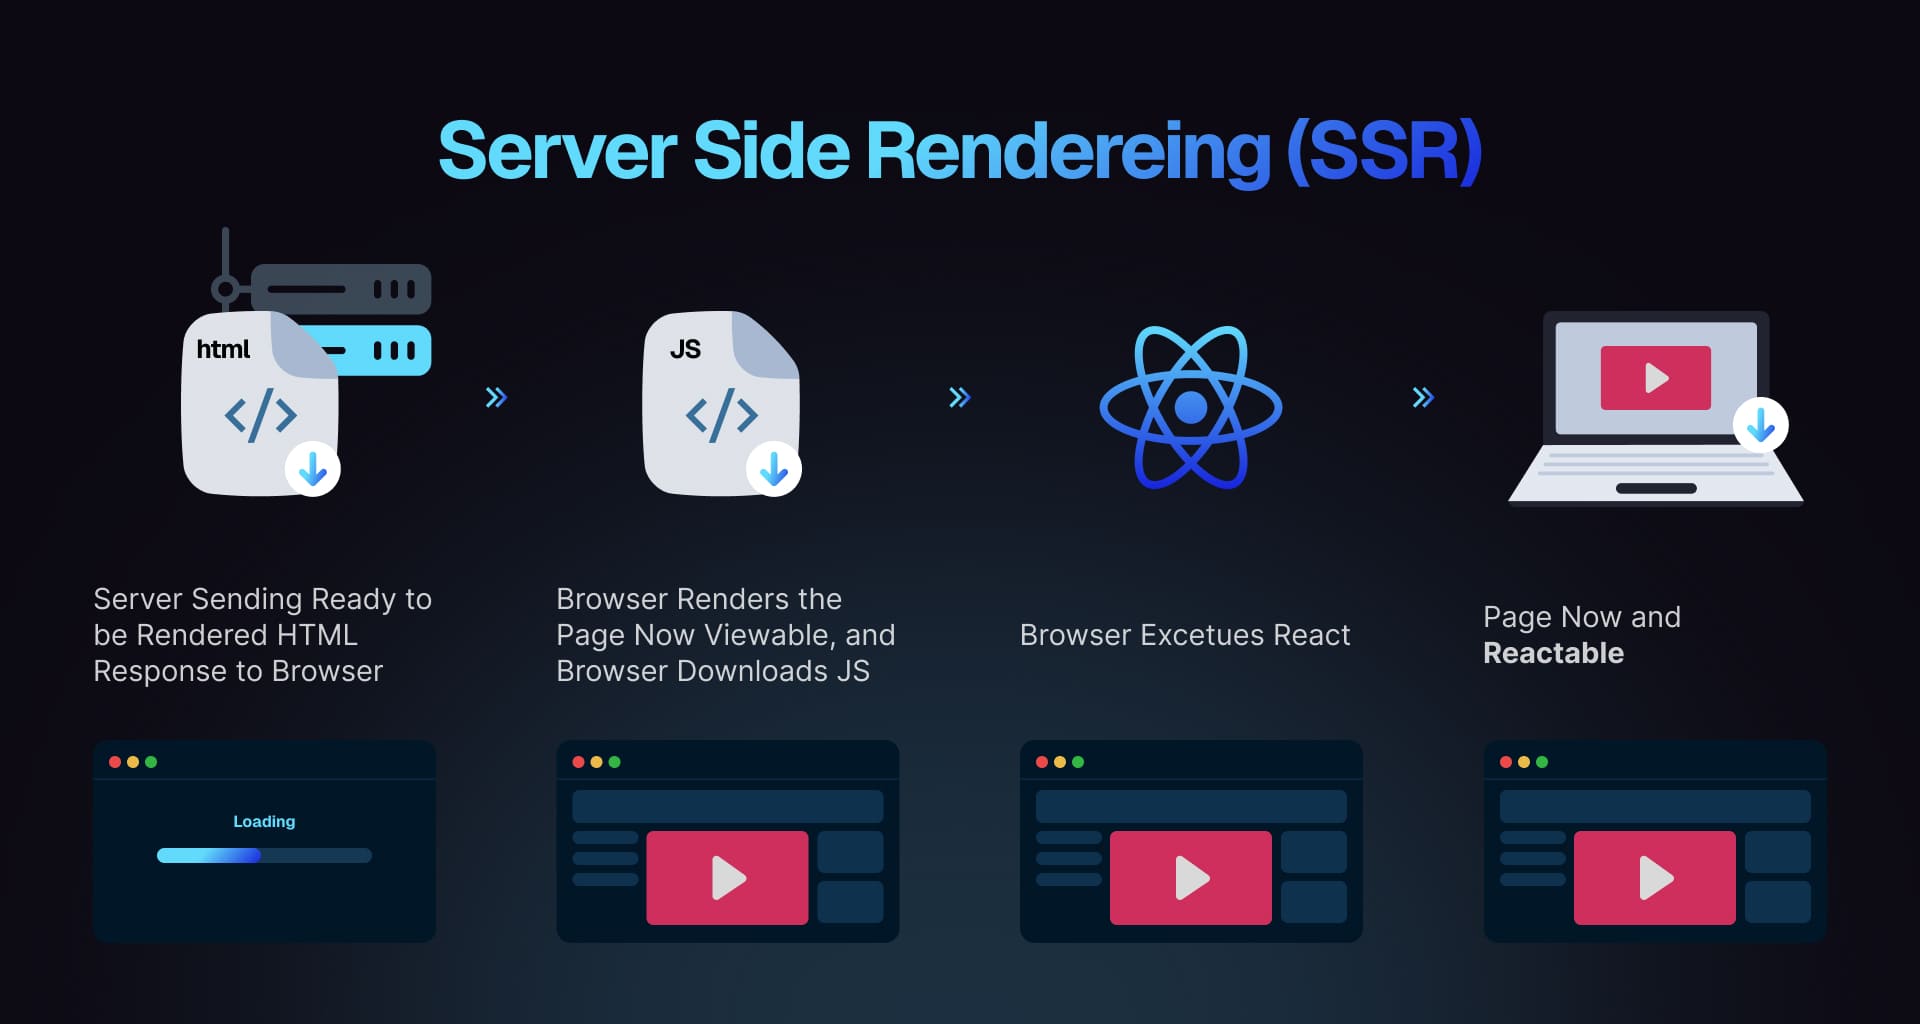
Find in-depth explanations and track study progress here ->
132. Explain static generation of React applications
Static generation pre-renders HTML at build time instead of runtime; this approach enhances performance by delivering static content quickly while improving SEO outcomes.
Find in-depth explanations and track study progress here ->
133. What are React Server Components?
Server Components render on the server and stream their output to the client. They never ship JavaScript to the browser, can await data directly (no useEffect round-trip), and can access server-only resources like the database or filesystem. They cannot use hooks like useState or useEffect, attach event handlers, or use browser-only APIs; those still belong in Client Components (files marked 'use client').
134. What's the difference between Server Components and Client Components?
| Server Component | Client Component | |
|---|---|---|
| Where it runs | Server (build or request time) | Browser (after hydration) |
| JS shipped | None | Yes |
| State / effects | Not allowed | Allowed |
| Event handlers | Not allowed | Allowed |
Can await data directly | Yes | No (use use or fetch in effect) |
| Can import the other | Yes (renders Client Components) | No (cannot import Server Components, only receive them as props/children) |
Server Components are typically the outer shell that fetches data; Client Components are the interactive leaves marked with 'use client'.
135. How would you diagnose a hydration mismatch?
Compare the server HTML and first client render using the same data. Check invalid HTML nesting, random IDs, current timestamps, locale or time-zone differences, and render branches that depend on window.
Make initial output deterministic, then apply browser-specific changes after hydration if needed. suppressHydrationWarning is a narrow escape hatch for unavoidable differences, not a repair strategy. See hydration troubleshooting.
Practice the related React quiz →
136. How would you choose Suspense boundary locations for a dashboard?
Group content that should appear together, then give independently useful regions their own boundaries. For example, show the account summary while a slower activity feed loads, with a placeholder that reserves space.
One boundary around the entire page can hide useful content; one around every small element can create distracting reveal sequences. Decide how already-visible content behaves during navigation and pair loading boundaries with error recovery. See revealing nested content.
Practice the related React quiz →
137. What can cross a Server Component to Client Component boundary?
Props must use React-supported serializable values. The protocol supports more than JSON, including certain built-ins and React elements, but arbitrary class instances and ordinary function closures cannot cross as general props. Server Function references are a supported special case.
Keep database clients and secrets on the server. Passing rendered server content as children is different from importing a server implementation into client code. See serializable boundary types.
138. What must a Server Function validate before changing data?
Treat arguments as untrusted input. Authenticate the caller, authorize the specific operation and resource, and validate the payload on the server. A disabled button or hidden client route provides none of those guarantees.
Also design duplicate-submission and retry behavior for the operation, especially payments or record creation. A Server Function is reachable through a network boundary and should be reviewed like an endpoint. See Server Function security.
139. How is server state different from local UI state?
Server state represents remotely owned data that can become stale or change outside the current browser. Its data layer needs policies for caching, refetching, request deduplication, and invalidation after writes.
Local UI state includes things like an open menu or an unsaved draft. Copying cached server data into a second global store creates competing sources of truth unless the copy has an explicit purpose, such as a draft with conflict handling. See TanStack Query's overview.
Practice the related React quiz →
140. How would you handle overlapping optimistic edits to the same record?
Track pending operations by identity and derive optimistic output from the confirmed base plus those operations. On success, reconcile the server result; on failure, remove or compensate for the failed operation without undoing newer edits.
Avoid restoring one old snapshot after a failure because it can erase a later success. Consider server versions or operation ordering for conflicts. useOptimistic helps display pending changes, but persistence and conflict policy remain application responsibilities. See useOptimistic.
141. Why can a Redux selector cause re-renders after unrelated actions?
React Redux's useSelector compares the selected result with the previous result using strict === equality by default. A selector that creates a new object or array whenever it runs can therefore trigger a render even when the fields the component uses have not changed.
// A new object whenever the selector runs:const summary = useSelector((state) => ({ count: state.counter.count }));// Select the primitive value directly when that is all the UI needs:const count = useSelector((state) => state.counter.count);
These are alternative selections inside a component beneath a Redux Provider, with useSelector imported from react-redux. For several fields, use separate selections, a memoized selector, or shallowEqual when a shallow comparison matches the data. A stable result avoids store-triggered renders for unchanged selections; it does not stop renders caused by parents, local state, or context. See selector equality comparisons.
142. How would you remove a data-fetching waterfall across nested components?
Draw the dependency graph first. If requests are independent, start them together in a route loader or server data layer instead of waiting for each child to mount. Preload genuinely likely next-step data where the framework supports it.
Keep truly dependent requests sequential, and use separate loading boundaries where partial results are useful. Moving the same waterfall to the server may reduce round trips but does not eliminate serial dependencies. See parallel and sequential fetching.
Practice the related React quiz →
143. How would you choose between static generation, SSR, and client rendering?
Choose per route using freshness, personalization, discovery, and interaction requirements. A public reference article may suit static HTML; personalized request-time content may need SSR; a private tool may accept client loading behind authentication.
Compare operational cost, cacheability, first useful content, and hydration work. Server Components are a separate architectural capability that can complement server rendering; they are not another name for SSR. See React Router rendering strategies.
Practice the related React quiz →
Component contracts and legacy migrations
144. What is the Flux pattern?
The Flux pattern manages application state through unidirectional data flow, simplifying debugging and enhancing maintainability with clear separation of concerns between Dispatcher, Stores, Actions, and Views.
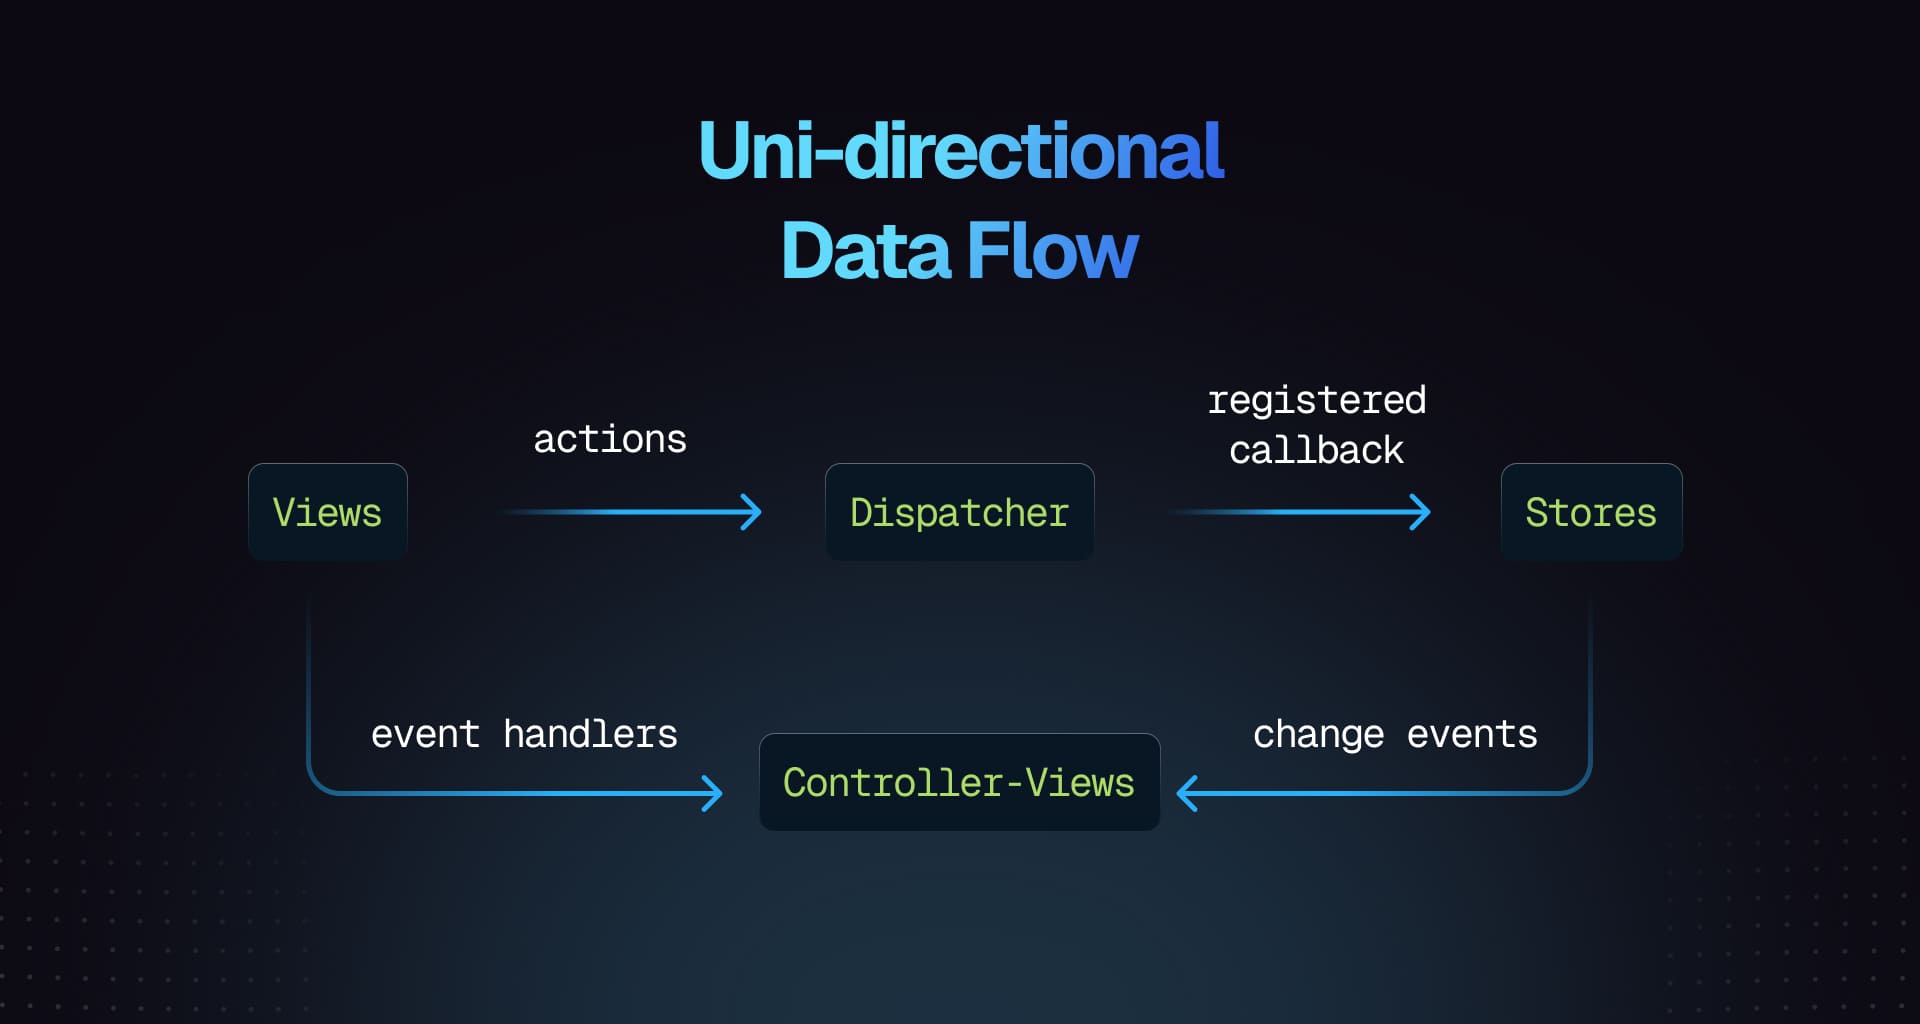
Find in-depth explanations and track study progress here ->
145. What are some pitfalls of using context in React?
Context in React can lead to performance issues if not handled carefully, causing unnecessary re-renders of components that consume the context, even if only part of the context changes. Overusing context for state management can also make the code harder to maintain and understand. It's best to use context sparingly and consider other state management solutions like Redux or Zustand for more complex scenarios.
Find in-depth explanations and track study progress here ->
146. What is Shallow Renderer in React testing?
Shallow rendering renders a component one level deep: its children are not rendered, only referenced as React elements. The intent was to isolate the component under test from its children.
The two implementations were react-test-renderer/shallow (a low-level API) and Enzyme's shallow() (a popular wrapper around it).
// Enzyme-style example (historical)import { shallow } from 'enzyme';const wrapper = shallow(<Button label="Click Me" />);expect(wrapper.text()).toBe('Click Me');
Don't use shallow rendering in new code. Enzyme is unmaintained and has no official React 17+ adapter. The React docs recommend React Testing Library, which renders components the way users see them and asserts on accessible output, so tests don't break on internal refactors. Use RTL's render with screen.getByRole / getByText instead.
147. What are the key differences between shallow rendering and full DOM rendering in React tests?
- Shallow Rendering: Renders only the component being tested, without rendering its child components. Useful for isolated unit testing.
- Full DOM Rendering: Mounts the entire component tree, including children, providing a complete DOM structure. Ideal for integration tests.
148. What is the TestRenderer package in React?
react-test-renderer was a utility for rendering React components to a plain JS object tree (rather than the DOM), useful for snapshot testing without a browser environment.
import TestRenderer from 'react-test-renderer';import MyComponent from './MyComponent';const renderer = TestRenderer.create(<MyComponent />);const tree = renderer.toJSON();expect(tree).toMatchSnapshot();
react-test-renderer is deprecated as of React 19, and the React team recommends migrating off it. For component tests, use React Testing Library with a DOM environment (jsdom for Jest, or built-in for Vitest). For snapshot tests, serialize the DOM produced by RTL's render:
import { render } from '@testing-library/react';const { container } = render(<MyComponent />);expect(container).toMatchSnapshot();
149. Why can defining a component inside another component reset its state?
Each parent render creates a new function for the nested component definition. When React encounters that function as an element type, it sees a different component type at the same position, so it can replace the subtree and reset its state.
Move component definitions to module scope and pass the values they need through props. This also avoids repeatedly losing input focus and restarting Effects. The problem is using a newly created function as a component type, not merely creating an event-handler closure inside a component. See why nested component definitions reset state.
Practice the related React quiz →
150. How would you design a reusable component that supports both controlled and uncontrolled usage?
Define who owns the value: a controlled API supplies value and onValueChange; an uncontrolled API supplies an initial defaultValue and lets the component own subsequent updates. Keep that mode stable for the instance's lifetime.
Specify callback timing, reset behavior, accessible naming, and how refs are exposed. Avoid an Effect that repeatedly copies a controlled prop into internal state. Test both modes through the public API, including parent-driven updates. See controlled and uncontrolled components.
Practice the related React quiz →
React Native interview questions
For mobile roles, candidates need to explain how React components interact with native UI, device storage, and platform APIs. These React Native interview questions cover those basics, then move into architecture, performance, and release decisions. The bridge question covers historical architecture; the other answers describe current development practices.
Freshers
151. What is React Native, and how is it different from React?
React is a library for describing UI with components, props, state, and hooks. React Native uses React to build native applications, including iOS and Android apps. Instead of browser elements such as div and span, you use components such as View and Text that render native UI.
On iOS and Android, the UI is not an HTML page inside a browser or WebView, and styles use JavaScript objects rather than CSS stylesheets. Some web concepts still carry over: React Native 0.82 introduced a subset of DOM-like APIs on native component refs, for example for measuring layout. That does not make arbitrary browser DOM code compatible with native apps.
152. What are the core components in React Native?
Use View to group and lay out content, Text to display text, Image for images, and TextInput for editable text. ScrollView provides a scrolling container, FlatList renders long lists using virtualization, and Pressable handles press interactions. These are built-in React Native components; higher-level components can compose native primitives rather than each mapping to a single native view.
Raw text nodes must be inside Text, rather than directly inside View. Nested Text can inherit text styles from its enclosing Text; a font style on a View does not automatically style its descendants.
153. How does styling work in React Native?
Pass a JavaScript object or array of objects to the style prop. StyleSheet.create helps organize named styles; it is not required. Properties use camelCase, such as backgroundColor. In a style array, later entries override earlier ones for the same property.
Numeric widths, heights, and spacing use density-independent units, while supported dimensions can also use percentage strings. Not every number represents a distance: opacity and flex, for example, are unitless values. Layout uses Flexbox with different defaults from the web: flexDirection is column and flexShrink is 0. There is no general CSS cascade; text inheritance is limited to nested Text.
154. What's the difference between ScrollView and FlatList?
ScrollView renders all its children at once, so it suits a short, bounded set of content. FlatList maintains a render window around visible items to reduce memory and rendering work for long lists. It can unmount items outside that window; virtualization is different from recycling an existing item component for different data.
Use FlatList for a feed or another large list. Keep important item state in the data or an external store because local component state can be lost when an item unmounts. FlatList compares props shallowly, so update data immutably and pass extraData when rendering depends on state outside data.
155. How do you write platform-specific code?
For small differences, check Platform.OS or use Platform.select to choose styles or behavior. For larger differences, create files such as button.ios.tsx and button.android.tsx, then import ./button without the platform suffix. React Native's bundler resolves the appropriate file for the target platform.
Keep shared logic in common modules so only the platform-specific behavior diverges. A .native file can separate native implementations from web implementations in a shared project.
156. What is Expo, and when would you use it?
Expo is a React Native framework with development tooling, native libraries, and services such as EAS Build and EAS Update. It is a useful starting point when you want standard navigation and device APIs without assembling the tooling yourself. The React Native setup guide recommends using a framework for new apps; unusual integration constraints can justify another setup.
Expo supports custom native code, but Expo Go only contains a fixed set of native libraries. To add native libraries or change native configuration beyond that set, use a development build of your own app. Expo does not require using its cloud build service: local builds are supported too.
157. How do you handle presses and controlled text input?
Use Pressable for custom press interactions. It provides onPress, onLongPress, and a pressed value in its style callback. Add an appropriate accessibility role and label so assistive technology can identify the control; Pressable alone does not establish button semantics.
To control a TextInput, supply value from state and update it with onChangeText, which receives the new string rather than a browser change event. keyboardType selects a keyboard layout, secureTextEntry obscures password text, and autoComplete supplies autofill hints. Obscuring the field does not encrypt its value or storage, and a numeric keyboard does not replace input validation.
Experienced
158. How did the legacy bridge architecture work, and what were its limitations?
The legacy bridge queued serialized messages between JavaScript and native code, typically batching calls and processing them asynchronously. Frequent updates or large payloads could make serialization and communication a bottleneck. Asynchronous rendering also made it difficult to coordinate updates that needed immediate native feedback.
This describes the usual bridge path, rather than proving every legacy native API was asynchronous: legacy modules also had limited synchronous method support. The question is useful for understanding older apps and migration decisions, rather than choosing an architecture for a new app.
159. What is the New Architecture, and what do JSI, Fabric, TurboModules, and Codegen do?
JSI (JavaScript Interface) allows JavaScript engines and C++ to interact without the legacy serialized bridge. Fabric is React Native's rendering system, TurboModules are its native module system with support for lazy loading, and Codegen generates native interfaces and integration code from typed TypeScript or Flow specifications. Together they support typed native integration and React features such as concurrent rendering.
The New Architecture became the default in React Native 0.76 and the only supported architecture in 0.82, released in October 2025. JSI enables synchronous interaction, but a module can still expose asynchronous methods. A synchronous call that performs expensive work can block its caller; removing the bridge does not automatically make an app fast.
160. What is Hermes, and why is it used?
Hermes is the JavaScript engine bundled with and used by default in React Native. In a standard release build, JavaScript is compiled to Hermes bytecode during the build, reducing the parsing and compilation work needed at startup. Development builds and custom bundle-loading setups need not follow the same path.
Hermes can improve startup time, memory use, and app size compared with JavaScriptCore. Those benefits depend on the app, so compare release builds on target devices rather than assuming a particular improvement. Hermes executes the app's JavaScript; native UI is still managed by React Native's renderer.
161. How would you improve a slow FlatList?
Measure first: expensive item renders, large images, and render-window configuration need different fixes. Use stable item keys through keyExtractor, keep renderItem inexpensive, and consider React.memo for costly rows whose props remain stable. Stabilize callbacks when that helps avoid repeated work.
If item dimensions are known, supply getItemLayout with accurate lengths and offsets, including separators. Tune initialNumToRender, windowSize, and batching for your devices: smaller windows save memory but can expose blank areas during fast scrolling; larger batches can delay interactions. If measurements still justify another list, consider FlashList's recycling model, and check the library version's architecture requirements.
162. How does navigation work in React Native?
On iOS and Android, navigation manages screens and route state rather than relying on a browser URL bar. React Navigation provides stack, tab, and drawer navigators. Its native stack uses platform navigation APIs for transitions and gestures. Navigation also needs to handle Android back behavior and incoming deep links.
Expo Router provides file-based routing for native and web apps, with support for deep links. Older versions built on React Navigation; Expo SDK 56 decoupled Expo Router from that dependency. Choose the routing model that fits the project and follow its version-specific documentation rather than mixing package APIs from older tutorials.
163. How do you choose storage for data on the device?
For small, non-sensitive preferences, use AsyncStorage or a key-value store such as MMKV. AsyncStorage is unencrypted; MMKV is unencrypted by default and supports optional encryption, which still requires protecting the encryption key. Neither should be treated as secure credential storage by default.
For tokens, use platform-backed secure storage such as expo-secure-store: it uses the iOS Keychain and, on Android, encrypted SharedPreferences backed by the Keystore. Avoid persisting user passwords. Secure storage can become unavailable after uninstalling or changes to biometric enrollment, depending on the platform and options, so handle missing values and require sign-in again when necessary. For larger structured data that needs queries and transactions, consider SQLite.
164. How do you handle different window sizes and safe areas?
Use Flexbox and content-driven sizing, with percentages or fixed density-independent dimensions where appropriate. Base responsive decisions on the app's current window rather than assuming the device's full screen size. useWindowDimensions updates when window size or font scale changes, including rotation and resizing.
Add a SafeAreaProvider and consume its insets through SafeAreaView or useSafeAreaInsets from react-native-safe-area-context. Apply insets where needed for system bars, notches, and the home indicator; avoid adding them again if a navigator already handles that edge. Safe-area insets do not account for the software keyboard, so keyboard avoidance needs separate handling. Check layouts with larger accessibility text sizes too.
Senior
165. How would you expose a native API to JavaScript, and choose between TurboModules and Expo Modules?
Check for a maintained library before writing a module. For a TurboModule, define a supported TypeScript or Flow spec extending TurboModule, configure Codegen, implement the generated native interfaces, and register the module. Android implementations commonly use Kotlin or Java; iOS implementations use Objective-C++ or Swift behind an Objective-C++ adapter. Cross-platform C++ modules are another option. See the TurboModule guide.
The Expo Modules API offers Swift and Kotlin APIs with less integration boilerplate, and can be installed in an existing React Native app. Prefer TurboModules when direct C++ integration is a requirement; consider Expo Modules when its API and Expo dependency suit the project. Decide which operations must be asynchronous, how errors cross the boundary, and which thread may access platform UI. Test both platform implementations.
166. How would you diagnose dropped frames during scrolling or navigation?
Reproduce the problem on a real device and identify whether JavaScript work, native UI work, or both are missing frame deadlines. A blocked JS thread can delay input handling and JS-driven updates even while native scrolling continues. Heavy work on the UI thread can still interrupt native animations.
Use the React Native DevTools React Profiler to investigate repeated or expensive renders, and native profiling tools such as Xcode Instruments or Android Studio for platform bottlenecks. Remove unnecessary renders, simplify costly rows, or move suitable computation away from interaction-critical work based on the measurements. Validate the improvement in release builds, including on lower-end target devices; development tools and checks add overhead, so a development profile alone is not a production benchmark.
167. How do animations work, and when would you use Reanimated?
The built-in Animated API describes animations of values and their connection to view properties. With useNativeDriver: true, supported animations run natively without a JavaScript calculation on every frame. The native driver supports non-layout properties, such as opacity and transforms, rather than Flexbox layout or position properties.
Reanimated uses shared values and worklets to update styles and respond to gestures on the UI thread. It is useful for gesture-driven or coordinated animations that need to continue while the JS thread is busy. Worklets must stay short: expensive work can block the UI thread, and moving work there does not guarantee smooth animation. React state and ordinary JS callbacks still need coordination with the JS thread.
168. When can you ship an over-the-air update, and how do you keep it compatible with installed apps?
An update system such as EAS Update can deliver JavaScript and assets to an app that already includes update support. It cannot add native code or permissions to an installed binary. A change that relies on a new native library or native configuration requires a new native build and distribution through the appropriate release channel.
Configure runtimeVersion so updates reach builds with a compatible native runtime. A matching value only helps if it accurately represents compatibility: reusing it after an incompatible native change can still ship a broken update. A fingerprint policy can help track native changes. Test against the same runtime as production, roll out gradually, and monitor failures so you can roll back. Download and activation timing depend on configuration, and updates must follow the applicable app-store rules.
169. How do you debug JavaScript errors and native crashes in a React Native app?
Use React Native DevTools for JavaScript console output, breakpoints, component inspection, and React profiling in development. Features vary with the React Native version, so use the tooling supported by the project's version rather than an old remote Chrome-debugging tutorial.
For native failures, inspect Xcode's debugger and device logs on iOS, or Android Studio and Logcat on Android. For a production crash, retain the matching JavaScript source maps and native debug symbols so a crash report can be mapped back to source code. Identify whether the failure starts in JavaScript or native code before choosing the debugger.
170. How would you test a React Native app, including behavior that depends on native APIs?
Use Jest for JavaScript logic and React Native Testing Library for component interactions and accessible output. Mock native dependencies where necessary, but remember that those tests run in a JavaScript environment: they do not exercise the actual iOS or Android implementation, native layout, or real device permissions.
Use native integration tests or device-based end-to-end tests for behavior that crosses that boundary. Tools such as Detox or Maestro can cover sign-in, navigation, and another critical flow on a simulator, emulator, or supported device. Include failure cases for important native behavior, such as denied permissions or unavailable secure storage. Keep slower end-to-end coverage selective and use faster tests for logic and component states.
Conclusion
These 150 React questions and 20 React Native questions should give you a good idea on what to expect in interviews. If you're looking for more in-depth React interview preparation materials, check out these:
- React Interview Playbook
- Practice React coding interview questions
- Practice React quiz interview questions
You can also explore the Top ReactJS Interview Questions repo - a collection of 50 commonly asked questions compiled from real interview experiences.
Related articles
 30 React interview questions and solutions, covering basic to advanced topics. Ideal for developers preparing for their next job interview in 2025